Life with three active kids means my kitchen is often a whirlwind. Between school pickups, homework battles, and trying to get a nourishing meal on the table, finding time for myself, let alone elaborate desserts, feels impossible. But food, for me, is love.
It’s how I show my family I care, and it’s how I recharge. That’s why I constantly search for recipes that deliver big on flavor and comfort, but don’t demand hours of my precious time. Indeed, I crave simple, wholesome options that make everyone happy without the fuss.
And let me tell you, when I first stumbled upon the idea of individual cheesecakes, my heart did a little happy dance. I immediately envisioned a version that fit our low-carb lifestyle, didn’t require baking, and could be prepped ahead. I wanted a treat that felt decadent yet guilt-free, a dessert I could feel good about serving my family.
Thus, I experimented with different crusts, sweeteners, and flavor profiles until I perfected it. The result? These glorious Mini Low-Carb Cheesecake Jars.
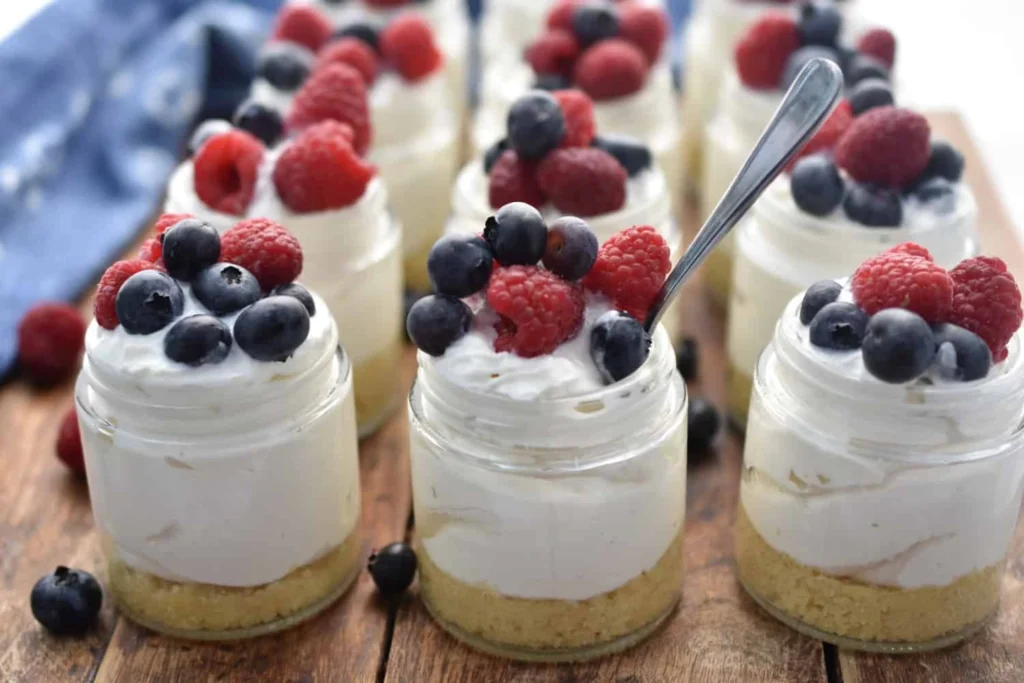
They are a revelation! Perfectly portioned, luxuriously creamy, and wonderfully guilt-free, these little jars quickly became a staple in our household. My kids, bless their picky hearts, absolutely adore them, and I love that I can whip up a batch on a Sunday evening, knowing we have a wholesome, delicious treat ready for the week.
Truly, these individual low-carb cheesecakes are a game-changer for busy families. They’re sweet without the sugar crash, satisfying without the heaviness, and just bursting with that classic cheesecake tang. Moreover, they offer all the rich flavor of a traditional cheesecake but with significantly fewer carbs, making them an ideal keto-friendly dessert. Ultimately, they represent a simple joy for busy lives, proving that you don’t need complicated ingredients or endless hours to create something truly special and nourishing.
Print
Mini Low-Carb Cheesecake Jars
Perfectly portioned, luxuriously creamy, and wonderfully guilt-free, these Mini Low-Carb Cheesecake Jars are a revelation. They deliver incredible flavor without the carb overload, are easy to make (no baking required), and are perfect for busy families or meal prep. A simple, wholesome treat that feels decadent yet fits a low-carb lifestyle.
- Total Time: 3 hours 20 minutes (includes chilling time)
- Yield: 6 servings
Ingredients
Almond flour (1 cup)
Erythritol (granulated, 2 tablespoons for crust)
Melted butter (1/4 cup)
Salt (1/4 teaspoon for crust, 1/8 teaspoon for filling)
Cream cheese (16 ounces, softened)
Erythritol (powdered, 1/2 cup for filling)
Heavy cream (1/2 cup, cold)
Vanilla extract (1 teaspoon)
Lemon juice (1 tablespoon)
Optional toppings: fresh berries, sugar-free chocolate shavings, whipped cream
Instructions
1. Step 1: Prepare the Crust. In a medium bowl, combine almond flour, 2 tablespoons granulated erythritol, and a pinch of salt. Pour in melted butter and mix until resembles wet sand. Divide evenly among 6 small jars (4-6 oz each) and press firmly into the bottom. Refrigerate 15-20 minutes.
2. Step 2: Make the Cheesecake Filling. In a chilled bowl, whip cold heavy cream to stiff peaks; set aside. In another large bowl, beat softened cream cheese with powdered erythritol and a pinch of salt until smooth (2-3 minutes). Beat in vanilla and lemon juice until just combined. Gently fold in whipped cream with a spatula until no streaks remain.
3. Step 3: Assemble and Chill. Spoon or pipe filling evenly over crusts. Smooth tops. Cover jars and refrigerate at least 3-4 hours (preferably overnight) until set. Add toppings just before serving, if desired.
Notes
Room temperature cream cheese is essential for a smooth filling. Use powdered sweetener to avoid grittiness. Chill jars overnight for best texture. Store in refrigerator up to 4-5 days. Freeze for up to 1 month (thaw in refrigerator). Toppings should be added just before serving.
- Prep Time: 20 minutes
- Cook Time: 0 minutes
- Category: Dessert
- Method: No-bake (mix, layer, chill)
- Cuisine: American
- Diet: Low-carb, Keto, Gluten-free
Nutrition
- Serving Size: 1 jar
- Calories: 350
- Sugar: 3g
- Sodium: 250mg
- Fat: 32g
- Saturated Fat: 17g
- Unsaturated Fat: 11g
- Trans Fat: 0g
- Carbohydrates: 8g
- Fiber: 2g
- Protein: 8g
- Cholesterol: 90mg
Why You’ll Love These Mini Low-Carb Cheesecake Jars
You are going to absolutely adore these Mini Low-Carb Cheesecake Jars for so many reasons. First and foremost, they deliver incredible flavor without the carb overload. This recipe makes enjoying a creamy, dreamy cheesecake possible even when you’re watching your sugar intake.
Furthermore, they are incredibly easy to make. No complicated baking, no water baths, and certainly no cracking worries! You simply mix, layer, and chill. It is truly that simple.
Moreover, these individual keto cheesecakes are perfectly portion-controlled. Serving desserts can often lead to overindulgence, but with these jars, everyone gets their own perfectly sized treat. This makes them ideal for meal prep, allowing you to grab a satisfying dessert whenever a craving strikes without any guesswork.
They are also incredibly versatile. You can customize the crust, the toppings, and even the flavor of the filling to suit your preferences, ensuring a fresh experience every time. Additionally, they are fantastic for entertaining.
Imagine serving these elegant little desserts at your next gathering; they look impressive, yet require minimal effort. Ultimately, these are more than just a dessert; they are a convenient, delicious, and guilt-free solution for your sweet cravings. They bring joy and comfort, proving that healthy eating never means sacrificing taste.
Ingredients You’ll Need
Creating these delightful Mini Low-Carb Cheesecake Jars requires simple, readily available ingredients. I always advocate for using quality components, as they truly make a difference in the final taste and texture. Here’s what you will gather:
| Ingredient Category | Ingredient | Quantity | Notes |
|---|---|---|---|
| For the Crust | Almond flour | 1 cup | Super fine almond flour works best for a delicate crust. |
| Erythritol (or preferred low-carb sweetener) | 2 tablespoons | Granulated, or adjust to taste. | |
| Melted butter | 1/4 cup | Unsalted butter, melted and cooled slightly. | |
| Pinch of salt | 1/4 teaspoon | Enhances flavor. | |
| For the Filling | Cream cheese | 16 ounces (2 blocks) | Full-fat, softened to room temperature. This is crucial for a smooth filling. |
| Erythritol (powdered) | 1/2 cup | Powdered or confectioners’ style erythritol dissolves best, preventing a gritty texture. Adjust to taste. | |
| Heavy cream | 1/2 cup | Cold, for whipping to stiff peaks. | |
| Vanilla extract | 1 teaspoon | Pure vanilla extract provides the best flavor. | |
| Lemon juice | 1 tablespoon | Freshly squeezed is ideal; it adds a lovely tang and balances the sweetness. | |
| Pinch of salt | 1/8 teaspoon | Balances the sweetness. | |
| For Topping (Optional) | Fresh berries, sugar-free chocolate shavings, whipped cream | As desired | Enhance presentation and flavor. |
You can see that each ingredient plays a vital role in creating that perfect balance of sweetness, tang, and creamy texture. I recommend gathering everything before you start to ensure a smooth and enjoyable cooking process.

Substitutions & Variations
One of the beautiful aspects of these Mini Low-Carb Cheesecake Jars is their incredible adaptability. You can easily tweak ingredients to suit dietary needs or simply experiment with different flavor profiles. Don’t feel constrained by the original recipe; let your creativity shine!
Sweeteners
While I use erythritol, you can certainly substitute it with other low-carb granular or powdered sweeteners like monk fruit sweetener, allulose, or a blend. Always adjust the quantity to your preferred level of sweetness, as different sweeteners have varying potencies. If using a liquid sweetener, you might need to slightly reduce other liquid ingredients to maintain the creamy consistency.
Crust Options
- Nut-Free Crust: If you have nut allergies, consider using sunflower seed meal mixed with melted butter and sweetener. Alternatively, you can create a simple coconut flour crust, though it will absorb more liquid, so adjust the butter accordingly.
- Chocolate Crust: Add 1-2 tablespoons of unsweetened cocoa powder to the almond flour crust mixture for a delicious chocolatey base. This works wonderfully with a classic vanilla filling or even a chocolate one.
- Coconut Shred Crust: For a tropical twist, toast some unsweetened shredded coconut and mix it with a small amount of melted coconut oil and sweetener. This adds a lovely texture and flavor.
- Crust-Free: You can completely omit the crust for an even lower-carb option. Simply spoon the filling directly into the jars.
Filling Flavors
- Lemon Zest: Boost the lemon flavor by adding the zest of one small lemon to the filling mixture. This creates a vibrant, refreshing cheesecake.
- Chocolate Cheesecake: Melt 2-3 ounces of sugar-free dark chocolate and fold it into the cream cheese mixture for a rich chocolate cheesecake. You can also add 1-2 tablespoons of unsweetened cocoa powder.
- Berry Swirl: Gently swirl a spoonful of sugar-free berry compote (made by simmering berries with a little sweetener) into the filling just before chilling.
- Peanut Butter: Add 1/4 cup of smooth, sugar-free peanut butter to the cream cheese mixture for a nutty, decadent flavor.
- Matcha Green Tea: For a unique flavor, sift 1-2 teaspoons of culinary-grade matcha powder into the cream cheese mixture. This yields a beautiful green hue and an earthy flavor.
Topping Ideas
The toppings truly elevate these jars! Fresh berries like raspberries, blueberries, or sliced strawberries are always a hit. You can also add a dollop of fresh whipped cream (sweetened with a touch of erythritol), a sprinkle of sugar-free chocolate shavings, or a drizzle of sugar-free caramel sauce.
For an extra crunch, sprinkle some chopped pecans or walnuts on top. Feel free to get creative and use what you love!
Step-by-Step Instructions
Making these Mini Low-Carb Cheesecake Jars is incredibly straightforward, perfect for a busy parent like me. Just follow these simple steps, and you will have a delicious, guilt-free treat ready in no time. Remember, the key to success often lies in having your ingredients prepped and at the right temperature.
Step 1: Prepare the Crust
- Combine Dry Ingredients: In a medium bowl, combine the almond flour, 2 tablespoons of erythritol, and a pinch of salt. Whisk these ingredients together thoroughly, ensuring an even distribution.
- Add Wet Ingredient: Pour the melted butter over the dry mixture. Use a fork or your hands to mix until the mixture resembles coarse, wet sand and holds together when pressed.
- Press into Jars: Divide the crust mixture evenly among your 6 small (4-6 ounce) jars or ramekins. Press the mixture firmly into the bottom of each jar using the back of a spoon or your fingertips. This creates a compact and sturdy base.
- Chill the Crust: Place the jars with the crusts in the refrigerator for at least 15-20 minutes while you prepare the filling. This helps the crust firm up and prevents it from becoming soggy.
Step 2: Make the Cheesecake Filling
- Whip Heavy Cream: In a separate, chilled mixing bowl, whip the cold heavy cream until it forms stiff peaks. Set this aside. Using a cold bowl and cold cream helps achieve better volume.
- Cream Cheese Mixture: In a large mixing bowl, beat the softened cream cheese with the powdered erythritol and a pinch of salt until the mixture is completely smooth and free of lumps. This should take about 2-3 minutes with an electric mixer. Scrape down the sides of the bowl frequently.
- Add Flavorings: Beat in the vanilla extract and lemon juice until just combined. Do not overmix at this stage.
- Fold in Whipped Cream: Gently fold the whipped heavy cream into the cream cheese mixture using a spatula. Use a light hand to maintain the airiness of the whipped cream. Mix until just combined and no streaks of whipped cream remain. Overmixing can deflate the filling, making it less airy.
Step 3: Assemble and Chill
- Fill the Jars: Spoon or pipe the cheesecake filling evenly over the chilled crusts in each jar. You can use a piping bag for a neater presentation, or simply spoon it in. Smooth the tops with the back of a spoon.
- Chill Thoroughly: Cover each jar loosely with a lid or plastic wrap. Refrigerate the Mini Low-Carb Cheesecake Jars for at least 3-4 hours, or preferably overnight, to allow them to set completely. This chilling time is essential for the cheesecake to firm up and for the flavors to meld beautifully.
- Add Toppings (Optional): Just before serving, add your desired toppings, such as fresh berries, a dollop of sugar-free whipped cream, or chocolate shavings.
Enjoy your homemade, guilt-free treat! These individual cheesecakes are truly a labor of love, designed to bring joy and nourishment to your table with minimal fuss.

Pro Tips for Success
Achieving that perfectly creamy texture and rich flavor in your Mini Low-Carb Cheesecake Jars comes down to a few key techniques. As a busy mom who loves simple yet delicious food, I have learned a few tricks along the way. Follow these pro tips for guaranteed success:
- Room Temperature Cream Cheese is Non-Negotiable: This is arguably the most important tip. Cold cream cheese will result in a lumpy, inconsistent filling. Ensure your cream cheese sits on the counter for at least an hour (or two!) before you start mixing. Softened cream cheese whips up beautifully smooth and incorporates all other ingredients seamlessly.
- Whip Heavy Cream Separately: Always whip your heavy cream to stiff peaks in a separate bowl before gently folding it into the cream cheese mixture. This method ensures maximum airiness and a light, fluffy texture for your cheesecake filling. Adding liquid cream directly to the cream cheese can thin it out too much.
- Do Not Overmix the Filling: Once you add the whipped cream, fold it in gently until just combined. Overmixing can deflate the whipped cream, leading to a denser, less airy cheesecake. Use a spatula and fold with a light hand.
- Use Powdered Sweetener for Filling: Granulated low-carb sweeteners can sometimes leave a slightly gritty texture in no-bake fillings. Powdered or confectioners’ style erythritol (or your chosen sweetener) dissolves much better, resulting in a smooth, silky filling. You can easily make your own powdered sweetener by blending granulated sweetener in a clean coffee grinder or high-speed blender.
- Chill Your Bowl and Whisk for Whipped Cream: For the best results when whipping heavy cream, place your mixing bowl and whisk (or stand mixer attachment) in the freezer for 10-15 minutes before you begin. The colder the tools, the faster and firmer your whipped cream will become.
- Taste and Adjust Sweetness: Everyone has a different preference for sweetness. Taste your cream cheese mixture before folding in the whipped cream, and adjust the amount of sweetener if necessary. Remember, the flavors will intensify slightly after chilling.
- Patience is Key for Chilling: I know it’s hard to wait, but allowing the cheesecake jars to chill for the recommended 3-4 hours (or even better, overnight) is crucial. This time allows the filling to set properly, firm up, and allows all the delicious flavors to fully develop and meld together.
- Vary Your Jars: While small mason jars are perfect, you can also use small ramekins, small tumblers, or even mini dessert cups. Just ensure they are food-safe and appropriately sized for individual portions.
By following these simple yet effective tips, you will consistently create stunning and delicious low-carb cheesecakes that impress everyone!
Storage & Reheating Tips
These Mini Low-Carb Cheesecake Jars are not only delicious but also incredibly convenient for meal prepping. Knowing how to store them properly ensures they stay fresh and delightful for days. Since this is a no-bake dessert, there’s no reheating involved.
Storage
- Refrigeration is Essential: Always store these cheesecake jars in the refrigerator. Dairy-based desserts require constant chilling to maintain freshness and safety.
- Airtight Containers: Place the jars in airtight containers or cover them tightly with plastic wrap or their lids. This prevents them from absorbing any unwanted odors from the refrigerator and helps to keep the cheesecake filling from drying out.
- Shelf Life: When stored correctly, these Mini Low-Carb Cheesecake Jars will stay fresh and delicious in the refrigerator for up to 4-5 days. They are a fantastic make-ahead dessert for busy weeks.
- Toppings Best Added Before Serving: While the cheesecake itself stores beautifully, I recommend adding any fresh fruit, whipped cream, or other delicate toppings just before serving. This prevents the toppings from becoming soggy or losing their fresh appearance.
Freezing (Optional)
You can also freeze these cheesecake jars for longer storage! This is a great option if you make a large batch or want to have desserts on hand for unexpected cravings.
- Prepare for Freezing: Ensure the cheesecake jars are fully set and thoroughly chilled in the refrigerator first.
- Wrap Tightly: Wrap each individual jar tightly with plastic wrap, then place them in an airtight freezer-safe container or a freezer bag. This double layer of protection helps prevent freezer burn.
- Freezer Shelf Life: These mini cheesecakes can be stored in the freezer for up to 1 month. Beyond that, the texture might start to degrade slightly.
- Thawing: To enjoy, simply transfer a frozen cheesecake jar to the refrigerator and let it thaw for several hours, or preferably overnight. Do not attempt to thaw at room temperature, as this can affect the texture.
Having these delicious low-carb treats ready to go is a lifesaver on busy days, making them an excellent addition to your weekly meal prep!
What to Serve With This Recipe
These Mini Low-Carb Cheesecake Jars are a star on their own, a truly satisfying and guilt-free dessert. However, they also make a perfect ending to a delightful meal or an excellent companion to a warm beverage. As a mom of three, I love finding main dishes that are simple, nourishing, and pair wonderfully with a sweet treat.
Imagine serving these creamy Mini Low-Carb Cheesecake Jars after a satisfying dinner. For a hearty, family-friendly option that everyone devours, consider our amazing Smash Burger Tacos. The savory, robust flavors of the tacos pair beautifully with the sweet tang of these individual cheesecakes, creating a balanced and utterly delicious meal experience.
Or, if you’re leaning towards something lighter yet equally fulfilling, our High-Protein Pasta Salad offers a fresh, vibrant contrast. The cool, refreshing pasta salad followed by a creamy cheesecake makes for a truly enjoyable meal, especially during warmer months.
For those who enjoy a bit of a kick, our Hot Honey Chicken Bowls make a fantastic main course before indulging in these individual treats. The spicy and sweet notes of the chicken create an exciting flavor journey that ultimately concludes with the comforting sweetness of the cheesecake jars. These pairings truly elevate a simple weeknight meal into something special.
Beyond dinner, these low-carb cheesecake jars are also a wonderful addition to a brunch spread. Serve them alongside a warm cup of coffee or a refreshing iced tea. They are perfect for small gatherings, potlucks, or even as a thoughtful gift.
Furthermore, if you are looking for other simple, nourishing recipe ideas to complement your week, consider our Peanut Butter Overnight Oats for a quick and easy breakfast or snack. Ultimately, these cheesecake jars fit seamlessly into various meal plans, bringing joy and satisfaction whenever they appear.
FAQs
You probably have some questions about these delightful Mini Low-Carb Cheesecake Jars, and I am here to help! Here are answers to some common inquiries I receive about this recipe.
Is this Mini Low-Carb Cheesecake Jars recipe truly keto-friendly?
Yes, absolutely! This recipe uses almond flour for the crust and low-carb sweeteners like erythritol instead of traditional sugar. We also rely on full-fat cream cheese and heavy cream, which are staples in a ketogenic diet. This combination ensures a delicious dessert that keeps your carb count low and your taste buds happy, fitting perfectly into a keto lifestyle.
Can I make these cheesecake jars ahead of time?
Indeed, you can! These Mini Low-Carb Cheesecake Jars are excellent for meal prep and actually taste even better after chilling overnight. This allows the flavors to fully meld and the texture to firm up perfectly. You can prepare them up to 4-5 days in advance and store them in the refrigerator, making them an ideal make-ahead dessert for busy weeks or entertaining.
What if I don’t have individual jars?
No problem at all! You can use various small containers. Small ramekins, dessert cups, or even a mini muffin tin lined with paper liners (for easier removal) will work.
If you are looking for a larger, single dessert, you can press the crust into an 8×8 inch square pan and spread the filling over it. Then, simply cut it into squares once chilled. The key is to have individual portions or a pan that allows for easy slicing.
How long do these low-carb cheesecake jars need to chill?
For the best results, I recommend chilling these cheesecake jars for a minimum of 3-4 hours. However, for a truly firm and well-set texture, letting them chill overnight in the refrigerator is ideal. The longer chilling time allows the cream cheese filling to completely set and ensures a delightful, firm consistency.
Can I use different types of sweeteners?
Certainly! While I specify erythritol, you can absolutely use other low-carb granular or powdered sweeteners such as monk fruit sweetener, allulose, or a blend. Always refer to the specific sweetener’s conversion chart, as their sweetness levels can vary. I do recommend using powdered versions for the filling to ensure a smooth, non-gritty texture.
“`