As a mom of three, my kitchen often feels like a bustling command center. Between school pickups, homework battles, and the endless demand for snacks, finding moments for myself, let alone elaborate cooking, feels impossible. Yet, food is love in my book, and I truly believe in nourishing my family with delicious, wholesome meals. That’s why recipes like this No-Bake Raspberry Protein Cheesecake are absolute gold in my world!
I remember one particularly chaotic Tuesday. The kids were bouncing off the walls, dinner was a hurried affair, and I desperately craved something sweet but also guilt-free. I wanted a treat that felt special, yet didn’t require me to fire up the oven or spend an hour babysitting a cooling dessert.
Sound familiar? That’s when the idea for a healthy, easy cheesecake hit me. I tinkered in the kitchen, experimenting with protein powder, fresh raspberries, and a simple crust, aiming for something truly delightful.
The result? Pure magic! This isn’t just any dessert; it’s a luscious, creamy, vibrant No-Bake Raspberry Protein Cheesecake that tastes incredibly indulgent but secretly packs a nutritional punch.
My kids devoured it, my husband asked for seconds, and I felt like a culinary superhero without breaking a sweat. It’s light, refreshing, and bursting with fresh berry flavor, all while delivering a satisfying boost of protein. Furthermore, the simplicity of a no-bake recipe means more time for cuddles, storytime, or simply enjoying a quiet moment after the kids are asleep.
Indeed, this recipe has become a cherished staple in our home, proving that healthy, homemade treats can be both easy and utterly delicious. Therefore, get ready to experience a dessert that genuinely brightens your day!
Print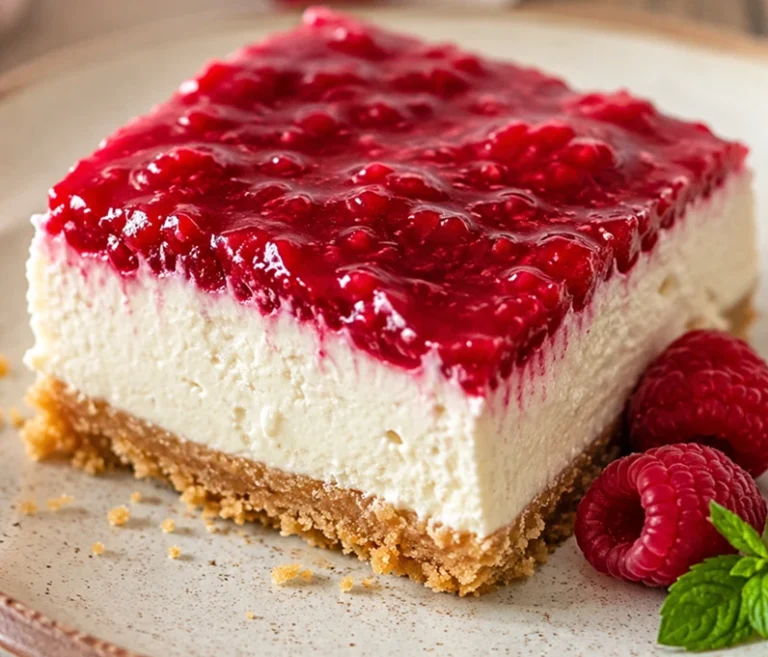
No-Bake Raspberry Protein Cheesecake
A luscious, creamy, no-bake cheesecake packed with protein and vibrant raspberry flavor. Perfect for busy families, it requires no oven time and delivers a guilt-free treat that tastes indulgent.
- Total Time: 6 hours 20 minutes (including chilling)
- Yield: 8 servings
Ingredients
For the Crust: 1 ½ cups graham cracker crumbs, 6 tablespoons melted unsalted butter, 2 tablespoons granulated sugar (optional), pinch of salt. For the Filling: 2 (8-ounce) blocks cream cheese (full-fat, softened), ½ cup plain Greek yogurt (full-fat), ½ cup vanilla protein powder (about 2 scoops), ½ cup powdered sugar (or to taste), 1 ½ cups fresh or frozen raspberries (thawed if frozen), 1 tablespoon fresh lemon juice, 1 teaspoon vanilla extract. For Garnish (Optional): fresh raspberries, mint leaves, a sprinkle of powdered sugar.
Instructions
1. 1. Prepare the Crust: Line an 8-inch springform pan with parchment paper on the bottom. Lightly grease the sides. In a medium bowl, mix graham cracker crumbs, melted butter, sugar (if using), and salt until combined. Press firmly into the bottom of the pan. Chill for 15-20 minutes.
2. 2. Make the Raspberry Puree: In a blender or food processor, combine raspberries and lemon juice; blend until smooth. For a smoother cheesecake, strain through a fine-mesh sieve to remove seeds. Set aside.
3. 3. Prepare the Cheesecake Filling: In a large bowl, beat softened cream cheese until light and fluffy. Add Greek yogurt and vanilla; beat until smooth. Gradually add protein powder and powdered sugar; beat on low until combined. Gently fold in raspberry puree until just mixed (swirl or fully combine).
4. 4. Assemble and Chill: Pour the filling over the chilled crust. Smooth the top. Cover loosely with plastic wrap and refrigerate for at least 6 hours, preferably overnight.
5. 5. Garnish and Serve: Run a thin knife around the edge before releasing the springform. Garnish with fresh raspberries, mint, and powdered sugar if desired. Slice with a sharp knife dipped in hot water for clean cuts.
Notes
Tips: Ensure cream cheese is at room temperature for smooth filling. Firmly press crust to prevent crumbling. Chill for at least 6 hours (overnight is best) to set properly. If using frozen raspberries, thaw and drain well. Strain puree for smoother texture. Store leftovers covered in the refrigerator for 3-5 days, or freeze individual slices for up to 2 months. No reheating needed – serve cold.
- Prep Time: 20 minutes
- Cook Time: 0 minutes
- Category: Dessert
- Method: No-Bake
- Cuisine: American
- Diet: High-Protein, Vegetarian, (adaptable to Gluten-Free, Dairy-Free)
Nutrition
- Serving Size: 1 slice (1/8 of cheesecake)
- Calories: 380
- Sugar: 24 g
- Sodium: 420 mg
- Fat: 22 g
- Saturated Fat: 13 g
- Unsaturated Fat: 6 g
- Trans Fat: 0 g
- Carbohydrates: 32 g
- Fiber: 3 g
- Protein: 18 g
- Cholesterol: 85 mg
Why You’ll Love This No-Bake Raspberry Protein Cheesecake Recipe
Truly, this No-Bake Raspberry Protein Cheesecake isn’t just another recipe; it’s a solution for busy, health conscious families like yours and mine. You’ll quickly discover so many reasons to adore this dessert. First, it requires absolutely no oven time!
This means you keep your kitchen cool, especially during warm summer months, and you save precious energy. Furthermore, the “no-bake” aspect makes it incredibly beginner-friendly. If you can mix ingredients, you can make this cheesecake.
Next, let’s talk about the protein power. As a mom, I’m always looking for creative ways to sneak in extra protein, and this cheesecake does it beautifully. The added protein helps keep you feeling full and satisfied, making it a much more nourishing choice than traditional sugary desserts.
This also prevents those post dessert sugar crashes. Consequently, you feel energized, not sluggish.
Moreover, the flavor is simply divine. The tangy freshness of raspberries perfectly complements the creamy, rich texture of the cheesecake filling. It’s a bright, summery taste that appeals to everyone.
Plus, you get the vibrant color from the raspberries, making it visually appealing and ready for any gathering. It truly looks impressive with minimal effort.
This recipe is also incredibly customizable. You can easily adjust sweetness levels or swap out fruits, making it versatile for different tastes or whatever you have on hand. It’s truly a family friendly dessert that everyone can enjoy, from toddlers to grandparents.
Finally, it makes an excellent make-ahead option. Prepare it the day before a party or a busy week, and you’ll have a fantastic dessert ready to go. Thus, you gain back valuable time in your schedule. Get ready to fall in love with this healthy, easy, and undeniably delicious protein cheesecake!
Ingredients You’ll Need
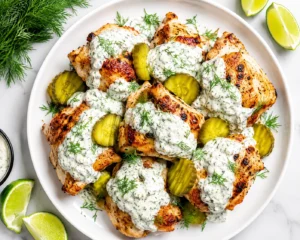
Gathering your ingredients for this No-Bake Raspberry Protein Cheesecake is wonderfully straightforward. We use simple, accessible items you likely already have or can easily find at your local grocery store. Here’s what you need to create this creamy, dreamy treat:
| Component | Ingredient | Quantity |
|---|---|---|
| For the Crust | Graham cracker crumbs | 1 ½ cups |
| Melted unsalted butter | 6 tablespoons | |
| Granulated sugar (optional) | 2 tablespoons | |
| Pinch of salt | ||
| For the Filling | Cream cheese (full-fat, softened) | 2 (8-ounce) blocks |
| Plain Greek yogurt (full-fat) | ½ cup | |
| Vanilla protein powder | ½ cup (about 2 scoops) | |
| Powdered sugar | ½ cup (or to taste) | |
| Fresh or frozen raspberries (thawed if frozen) | 1 ½ cups | |
| Fresh lemon juice | 1 tablespoon | |
| Vanilla extract | 1 teaspoon | |
| For Garnish (Optional) | Fresh raspberries, mint leaves, a sprinkle of powdered sugar |
These ingredients come together beautifully to create a balanced, flavorful cheesecake that truly satisfies. Make sure your cream cheese is at room temperature; this ensures a perfectly smooth filling without any lumps.
[image 2]
Substitutions & Variations
One of the best aspects of this No-Bake Raspberry Protein Cheesecake is its incredible flexibility. You can easily tailor it to fit various dietary needs, flavor preferences, or simply what you have on hand. Don’t feel limited by the original recipe; instead, use it as a delicious starting point!
Crust Variations:
- Gluten-Free: Simply use gluten-free graham crackers or crushed gluten-free cookies for the crust. Alternatively, a nut-based crust made from almonds, walnuts, or pecans (blended with a little melted coconut oil and sweetener) works wonderfully.
- Healthier Crust: Substitute some of the graham cracker crumbs with rolled oats or finely chopped nuts for added fiber and healthy fats. You can also reduce or omit the granulated sugar in the crust, relying on the natural sweetness of the other components.
- Different Cookies: Try using crushed Oreos (for a chocolate base), digestive biscuits, or even vanilla wafers for a different flavor profile.
Filling Substitutions:
- Protein Powder: While vanilla is excellent, feel free to experiment with other flavors! Strawberry protein powder would enhance the berry flavor, or even a plain unflavored protein powder if you want the raspberry to shine purely. Whey protein works best for texture, but plant-based protein powders (like pea or soy protein) can also work; adjust liquid content as needed, as they can sometimes absorb more moisture.
- Dairy-Free: Use dairy-free cream cheese alternatives and a plant based Greek yogurt (like coconut or almond-based). Ensure your protein powder is also dairy-free.
- Sweetener: Instead of powdered sugar, you can use maple syrup, agave nectar, or a sugar-free sweetener like erythritol or stevia. Adjust the amount to your taste, remembering that liquid sweeteners might slightly alter the consistency.
- Greek Yogurt: If you don’t have Greek yogurt, regular plain yogurt works, but make sure to strain it beforehand to remove excess whey, preventing a runny filling. Alternatively, a dairy-free yogurt can be used for a vegan version.
Flavor & Fruit Variations:
- Other Berries: Strawberries, blueberries, or mixed berries can easily replace raspberries. Just make sure to thaw and drain frozen berries well to avoid excess moisture. A blueberry protein cheesecake is incredibly delicious too!
- Citrus Kick: Enhance the tanginess by adding extra lemon zest or even a touch of lime juice instead of lemon for a different citrus note.
- Chocolate Swirl: Melt a bit of dark chocolate and swirl it into the raspberry puree before folding it into the cheesecake mixture for a chocolate raspberry delight.
- Nut Butter Twist: Incorporate a tablespoon or two of peanut butter or almond butter into the filling for a richer, nutty flavor. This pairs especially well with chocolate protein powder. If you love peanut butter, you might also enjoy my Peanut Butter Overnight Oats for another protein-packed treat.
- Extracts: A drop of almond extract alongside vanilla can add a lovely depth of flavor.
Do not hesitate to get creative in your kitchen. Experiment with these variations to find your perfect rendition of this delightful protein cheesecake!
Step-by-Step Instructions
Creating this No-Bake Raspberry Protein Cheesecake is incredibly simple and requires no special skills. Just follow these easy steps, and you’ll have a stunning dessert chilling in your fridge in no time! Always read through all the steps before you begin.
Part 1: Prepare the Crust
- Prepare Your Pan: First, line an 8-inch springform pan with parchment paper on the bottom. Lightly grease the sides with cooking spray or butter. This ensures easy removal later.
- Make the Crumbs: Next, place graham cracker crumbs, melted butter, sugar (if using), and a pinch of salt in a medium bowl. Stir thoroughly until the mixture resembles wet sand and is evenly combined.
- Press the Crust: Then, press the crumb mixture firmly into the bottom of the prepared springform pan. Use the back of a spoon or the bottom of a flat glass to create an even, compact layer. Ensure it extends slightly up the sides if you prefer a thicker crust edge.
- Chill the Crust: Place the pan in the refrigerator for at least 15-20 minutes while you prepare the filling. This helps the crust set and become firm.
Part 2: Make the Raspberry Puree
- Process Raspberries: In a small food processor or blender, combine the fresh or thawed frozen raspberries with the fresh lemon juice. Blend until you achieve a smooth puree.
- Strain (Optional but Recommended): For a super smooth cheesecake, press the raspberry puree through a fine-mesh sieve over a clean bowl. This removes any seeds. Discard the seeds.
- Set Aside: Set the vibrant raspberry puree aside. You will fold it into the cheesecake mixture shortly.
Part 3: Prepare the Cheesecake Filling
- Beat Cream Cheese: In a large mixing bowl, using an electric hand mixer or a stand mixer with the paddle attachment, beat the softened cream cheese on medium speed until it becomes light, fluffy, and completely smooth. Scrape down the sides of the bowl as needed.
- Add Yogurt and Vanilla: Next, add the Greek yogurt and vanilla extract to the cream cheese mixture. Beat again until well combined and smooth.
- Incorporate Protein Powder and Sweetener: Gradually add the vanilla protein powder and powdered sugar to the bowl. Beat on low speed until fully incorporated and the mixture is smooth and lump-free. Avoid overmixing.
- Fold in Raspberry Puree: Gently fold the prepared raspberry puree into the cheesecake mixture. Swirl it in gently for a marbled effect, or fully combine for a uniformly pink cheesecake.
Part 4: Assemble and Chill
- Fill the Pan: Pour the cheesecake filling evenly over the chilled graham cracker crust in the springform pan.
- Smooth the Top: Gently tap the pan on the counter a few times to release any air bubbles. Use an offset spatula or the back of a spoon to smooth the top of the cheesecake.
- Chill Thoroughly: Cover the pan loosely with plastic wrap. Transfer the cheesecake to the refrigerator and chill for a minimum of 6 hours, or preferably overnight. Chilling is crucial; it allows the cheesecake to set completely and achieve its signature firm, yet creamy, texture.
Part 5: Garnish and Serve
- Release from Pan: Once thoroughly chilled and set, carefully run a thin knife around the edge of the pan before releasing the springform sides.
- Garnish: Transfer the cheesecake to a serving plate. Garnish with fresh raspberries, a few mint leaves, and a light dusting of powdered sugar, if desired.
- Slice and Enjoy: Slice the No-Bake Raspberry Protein Cheesecake using a sharp knife dipped in hot water and wiped clean between each slice for neat cuts. Serve immediately and enjoy!
Enjoy the process, and soon you’ll be savoring a delicious, healthy treat that looks and tastes fantastic!
[image 3]
Pro Tips for Success
Even though this No-Bake Raspberry Protein Cheesecake is incredibly easy, a few simple “pro tips” can elevate it from good to absolutely amazing. As a busy mom, I’ve learned these little tricks ensure consistent success every time, saving you time and frustration.
- Room Temperature Cream Cheese: This tip is non-negotiable for a silky smooth filling. Cold cream cheese will result in lumps, no matter how long you beat it. Take your cream cheese out of the fridge at least an hour before you plan to mix.
- Firmly Press the Crust: Do not be shy when pressing the graham cracker crust into the pan. Use the bottom of a measuring cup or a flat glass to really pack it down. A firm crust prevents crumbling when you slice and serve the cheesecake.
- Chill Time is Crucial: Patience is a virtue, especially with no-bake cheesecakes. A minimum of 6 hours is essential, but overnight chilling truly yields the best results. This allows the cheesecake to set completely, ensuring perfect slices and a stable texture. Rushing this step will give you a soft, unset dessert.
- Drain Berries Well (if frozen): If using frozen raspberries, make sure to thaw them completely and drain any excess liquid before pureeing. Extra water can make your cheesecake filling too loose.
- Strain Raspberry Puree: For the smoothest, most elegant cheesecake, always strain your raspberry puree through a fine-mesh sieve. This removes those tiny seeds that can detract from the creamy texture.
- Avoid Overmixing the Filling: Once the cream cheese and yogurt are smooth, add the protein powder and powdered sugar, mixing just until combined. Overmixing can incorporate too much air, which can lead to a less dense, almost fluffy texture that might not set as firmly.
- Clean Slices: For perfectly neat slices, dip your sharp knife into hot water and wipe it clean between each cut. This prevents the cheesecake from sticking to the blade and creates beautiful, clean edges.
- Taste and Adjust Sweetness: Before adding the raspberry puree, taste a small amount of your cheesecake filling. Adjust the powdered sugar to your preference. Everyone’s sweet tooth is different, and protein powders can vary in sweetness too.
- Garnish Just Before Serving: Add fresh raspberries, mint leaves, or a sprinkle of powdered sugar right before you present the cheesecake. This keeps the garnishes looking fresh and vibrant.
Following these simple tips will guarantee a picture perfect and incredibly delicious No-Bake Raspberry Protein Cheesecake every single time. Happy baking (or rather, no-baking)!
Storage & Reheating Tips
This No-Bake Raspberry Protein Cheesecake is perfect for making ahead, which is a huge win for busy schedules! Proper storage ensures it stays fresh, delicious, and safe to eat for days.
Storage:
- Refrigerator: Keep your cheesecake covered tightly with plastic wrap or in an airtight container. Store it in the refrigerator for up to 3-5 days. The plastic wrap helps prevent it from absorbing other odors from your fridge and keeps it from drying out.
- Freezer: This cheesecake freezes beautifully! For best results, first chill the cheesecake completely until very firm. Then, you have a couple of options:
- Whole Cheesecake: If freezing a whole cheesecake, place it uncovered in the freezer for about 1-2 hours until solid. Then, wrap it tightly in several layers of plastic wrap, followed by a layer of aluminum foil. This double layer protects it from freezer burn.
- Individual Slices: For easy portion control, slice the cheesecake first. Place individual slices on a baking sheet lined with parchment paper and freeze until solid. Then, wrap each slice individually in plastic wrap and store them in an airtight freezer-safe container or freezer bag.
Frozen cheesecake can last for up to 1-2 months. Thaw it in the refrigerator overnight before serving. Do not thaw at room temperature, as this can affect the texture.
Reheating:
There is no need to reheat this No-Bake Raspberry Protein Cheesecake. It is a dessert designed to be enjoyed cold, straight from the refrigerator. Reheating would cause the delicate texture to break down and melt, which you definitely want to avoid! Just pull it from the fridge or freezer (after thawing) and serve.
With these storage tips, you can enjoy this delightful protein cheesecake throughout the week or have a healthy treat ready for unexpected guests!
What to Serve With This Recipe
This No-Bake Raspberry Protein Cheesecake shines as a standalone dessert, a light snack, or even a healthier breakfast option (yes, protein for breakfast!). However, you can certainly elevate the experience with a few thoughtful additions or pair it with the right meal. As a mom of three, I appreciate versatility!
For Dessert Perfection:
- Fresh Berries: A simple scattering of extra fresh raspberries, blueberries, or sliced strawberries adds even more freshness and color. It enhances the natural fruitiness.
- A Dollop of Cream: A small spoonful of homemade whipped cream (lightly sweetened, if at all) or coconut cream provides a luxurious counterpoint to the cheesecake’s tang.
- Mint Leaves: A few fresh mint leaves not only add a pop of green but also a subtle, refreshing aroma that complements the raspberries beautifully.
- Chocolate Shavings: A sprinkle of dark chocolate shavings can add a touch of indulgence and pairs wonderfully with raspberries.
- A Warm Beverage: Serve a slice with a comforting cup of coffee, herbal tea, or even a decaf latte. This creates a relaxing moment, perfect after a busy day.
As Part of a Meal:
Because this cheesecake is lighter and protein-packed, it makes a fantastic ending to a variety of meals without leaving you feeling overly stuffed.
- Light Dinner: Pair it after a lighter, savory meal. Think grilled chicken and a big salad, or a simple vegetable stir-fry.
- Hearty Mains: If you’re serving something more substantial, like my Smash Burger Tacos or Hot Honey Chicken Bowls, this protein cheesecake offers a refreshing and balanced dessert that won’t weigh you down after a satisfying main course.
- Potlucks and Gatherings: Its vibrant color and delicious taste make it a perfect addition to any potluck or family gathering. It travels well and impresses without the fuss of baking. Consider serving it after a robust High-Protein Pasta Salad for a complete, crowd-pleasing menu.
Ultimately, this cheesecake is a joy on its own, but these pairings can definitely enhance your enjoyment!
FAQs About No-Bake Raspberry Protein Cheesecake
Got questions about this amazing No-Bake Raspberry Protein Cheesecake? I’ve compiled some frequently asked questions to help you master this recipe and enjoy it to the fullest. As a mom always looking for quick answers, I’ve got you covered!
Can I make this cheesecake ahead of time?
Absolutely, and I highly recommend it! This No-Bake Raspberry Protein Cheesecake is an ideal make-ahead dessert. Preparing it the day before you plan to serve it allows for ample chilling time, which is crucial for it to set properly and develop its full flavor and texture.
This also means one less thing to worry about on a busy day. Simply cover it tightly and keep it in the refrigerator overnight.
What kind of protein powder works best?
For the best texture and flavor in this No-Bake Raspberry Protein Cheesecake, I suggest using a good quality vanilla whey protein powder. Whey protein tends to mix smoothly and contribute to the creamy consistency without being gritty.
If you prefer a plant-based option, pea protein or a blended plant-based protein powder can work, but be aware that they sometimes absorb more liquid, so you might need to adjust the amount of Greek yogurt slightly to achieve the desired consistency. Always choose a protein powder you enjoy the taste of!
Is this recipe gluten-free/dairy-free?
The original recipe for this No-Bake Raspberry Protein Cheesecake is not inherently gluten-free or dairy-free, but it’s very easy to adapt! For a gluten-free version, simply use gluten-free graham crackers for the crust.
For a dairy-free cheesecake, substitute dairy cream cheese with a good quality plant-based cream cheese, use a plant-based Greek yogurt alternative (like coconut or almond-based), and ensure your protein powder is also dairy-free (e.g., a pea or soy protein isolate). These substitutions work wonderfully to create equally delicious dietary-friendly options.
Can I use other fruits instead of raspberries?
Yes, absolutely! The beauty of this No-Bake Raspberry Protein Cheesecake is its versatility. You can easily swap out raspberries for other berries or fruits.
Strawberries, blueberries, blackberries, or a mixed berry blend would all be fantastic. If using frozen fruit, make sure to thaw and drain it very well to prevent excess moisture from making the cheesecake runny. You could even try a tropical twist with mango or passion fruit puree, adjusting the lemon juice as needed to balance the sweetness.
How long does No-Bake Raspberry Protein Cheesecake last in the fridge?
When stored properly, this No-Bake Raspberry Protein Cheesecake remains fresh and delicious in the refrigerator for 3 to 5 days. Ensure you cover it tightly with plastic wrap or place it in an airtight container. This prevents it from drying out and absorbing any unwanted odors from other foods in your fridge.
For longer storage, you can also freeze individual slices, which will keep well for up to 1-2 months. Just thaw them overnight in the refrigerator before serving.