Life with three busy kids often feels like a beautiful, chaotic whirlwind. Days melt into evenings, filled with school runs, homework battles, playground adventures, and endless snack requests. By the time I finally settle down, I crave something sweet.
Something that feels like a treat, but won’t undo all my efforts to eat nourishing food throughout the day. For a long time, I struggled to find that perfect balance. Most desserts either felt too heavy, too sugary, or required a complicated baking process I simply didn’t have time for.
Then, inspiration struck! One evening, while eyeing some leftover Greek yogurt and a half-eaten box of graham crackers, the idea for High Protein Cheesecake Jars was born. I wanted all the creamy, tangy deliciousness of cheesecake, but without the fuss and packed with a protein punch to keep me feeling satisfied.
I experimented in my kitchen, a flurry of mixing and layering, and the result? Pure magic! These jars became an instant hit, not just with me, but even my picky eaters sneak a spoonful (or two!) when they think I’m not looking.
These High Protein Cheesecake Jars are now my go to for a guilt-free indulgence, a quick breakfast on the go, or a post-workout recovery snack. They satisfy that sweet tooth while delivering a healthy dose of protein, keeping me energized and preventing those late night sugar crashes. They are incredibly simple to assemble, require no baking, and taste absolutely incredible. Get ready to fall in love with your new favorite healthy dessert!
Why You’ll Love These High Protein Cheesecake Jars
You are about to discover your new favorite dessert, snack, or even breakfast! These delightful High Protein Cheesecake Jars offer so many reasons to adore them. First, they are incredibly easy.
Forget turning on the oven; this is a completely no-bake recipe, perfect for busy schedules and hot summer days. You simply mix, layer, and chill.
Next, the protein power! Each jar packs a serious protein punch, thanks to Greek yogurt and protein powder. This means these aren’t just empty calories; they actually keep you feeling full and satisfied, curbing those unhealthy cravings. You can enjoy a sweet treat without the guilt.
Portion control becomes effortless with individual jars. You get a perfect serving every time, making it easier to stick to your health goals. Plus, they are wonderfully customizable.
Experiment with different toppings, crusts, and protein powder flavors to create endless variations. They also make fantastic meal prep options, ready for you to grab and enjoy throughout the week. They truly embody my philosophy of simple, nourishing, and utterly delicious food.
Ingredients You’ll Need
Gathering your ingredients is the first step to creating these incredible High Protein Cheesecake Jars. You likely have many of these staples in your pantry already. I’ve broken them down by component for easy shopping and assembly.
| Component | Ingredient | Quantity |
|---|---|---|
| For the Crust: | Graham Cracker Crumbs | 1 cup |
| Melted Unsalted Butter | 4 tbsp | |
| Granulated Sugar (optional) | 1 tbsp | |
| For the Filling: | Plain Greek Yogurt (full-fat recommended) | 2 cups |
| Cream Cheese (softened, full-fat or light) | 8 oz block | |
| Vanilla Protein Powder | 1/2 cup (2 scoops) | |
| Powdered Sugar (or maple syrup/honey) | 1/4 cup (or to taste) | |
| Vanilla Extract | 1 tsp | |
| Lemon Juice (freshly squeezed) | 1 tbsp | |
| For Topping (Optional): | Fresh Berries | 1 cup |
| Sugar-Free Whipped Cream | as desired | |
| Chocolate Shavings | as desired |
Substitutions & Variations
One of the best things about these High Protein Cheesecake Jars is their incredible versatility. You can easily adjust them to fit your dietary needs, taste preferences, or whatever you happen to have in your pantry. Don’t be afraid to get creative and make them your own!
Crust Creativity
While graham cracker crumbs provide that classic cheesecake base, feel free to switch things up. For a gluten-free option, use gluten-free graham crackers or crushed gluten-free oat cookies. You can also try crushed digestive biscuits, vanilla wafers, or even a blend of nuts and dates pulsed in a food processor for a naturally sweet, no-bake crust.
Mix in a pinch of cinnamon or cocoa powder with your crumbs for an extra flavor dimension. If you prefer to skip the added sugar in the crust, simply omit the tablespoon of granulated sugar.
Filling Flavor Fusions
The core of these High Protein Cheesecake Jars is the creamy, tangy filling. You have many options here. For a dairy-free version, use dairy-free cream cheese and a thick plain dairy-free yogurt (like coconut or almond-based Greek-style yogurt).
Adjust the sweetness as needed, as dairy-free yogurts can vary in tartness. When it comes to protein powder, vanilla is a great base, but experiment with chocolate protein powder for a mocha cheesecake jar, or strawberry protein powder for a fruity twist. If you don’t have protein powder, you can increase the amount of Greek yogurt and add a little more sweetener, but you will lose some of the protein boost.
You can also use a sugar substitute like erythritol or stevia instead of powdered sugar to reduce carb content. For an extra tang, increase the lemon juice slightly or add a teaspoon of lemon zest.
Topping Transformations
The toppings are where you can really let your personality shine! Fresh berries like strawberries, blueberries, raspberries, and blackberries are always a hit. They add natural sweetness and a beautiful pop of color.
Other fantastic fruit options include sliced peaches, mango chunks, or a simple homemade fruit compote. For chocolate lovers, drizzle with sugar-free chocolate syrup, sprinkle with mini chocolate chips, or add cocoa nibs. A dollop of sugar-free whipped cream makes these jars feel extra decadent.
Nut butters also work wonderfully; a swirl of peanut butter or almond butter adds healthy fats and a boost of flavor. You could even add a sprinkle of chopped nuts or granola for extra crunch. Think about adding a drizzle of my hot honey (minus the heat, of course!) for a unique sweet touch, or simply a touch of honey.
Step-by-Step Instructions
Making these High Protein Cheesecake Jars is incredibly simple. Follow these steps, and you will have a delicious, satisfying treat in no time. This recipe is all about easy layering and minimal fuss, perfect for a busy parent like me!
- Prepare the Crust: In a medium bowl, combine the graham cracker crumbs, melted butter, and optional granulated sugar. Stir everything together until the crumbs are evenly moistened. They should resemble wet sand.
- Layer the Crust: Divide the crust mixture evenly among four 8-ounce mason jars or dessert cups. Press the mixture firmly into the bottom of each jar using the back of a spoon or your fingertips. Place the jars in the refrigerator to chill while you prepare the filling.
- Make the Filling: In a large mixing bowl, add the softened cream cheese. Beat it with an electric mixer (or a whisk if you want an arm workout!) until it becomes smooth and creamy, with no lumps.
- Add Remaining Filling Ingredients: To the cream cheese, add the plain Greek yogurt, vanilla protein powder, powdered sugar (or your chosen sweetener), vanilla extract, and fresh lemon juice.
- Mix Until Smooth: Beat the mixture on medium speed until everything is thoroughly combined and the filling is completely smooth and fluffy. Scrape down the sides of the bowl as needed to ensure all ingredients incorporate fully. Taste the filling and adjust sweetness or lemon tang if desired.
- Fill the Jars: Spoon or pipe the cheesecake filling evenly over the chilled crusts in each jar. You can use a piping bag for a neater look, or simply spoon it in. Gently tap the jars on the counter a few times to settle the filling and remove any air bubbles.
- Chill Thoroughly: Cover the jars with lids or plastic wrap. Transfer them to the refrigerator and chill for at least 4 hours, or preferably overnight. This chilling time is crucial for the cheesecake to set properly and for the flavors to meld.
- Add Toppings and Serve: Once thoroughly chilled and set, remove the jars from the refrigerator. Top them with your favorite fresh berries, a dollop of whipped cream, chocolate shavings, or any other desired toppings just before serving. Enjoy your delicious and healthy High Protein Cheesecake Jars!
Pro Tips for Success
Achieving perfect High Protein Cheesecake Jars is simple, but a few insider tips can elevate your results from good to absolutely amazing. These little tricks make a big difference, ensuring a smooth, creamy texture and delightful flavor every time.
- Soften the Cream Cheese: Always use softened cream cheese. Take it out of the refrigerator at least 30 minutes to an hour before you start. This ensures a lump-free, silky-smooth filling. Cold cream cheese will result in a clumpy texture that no amount of beating can fully fix.
- Use Full-Fat Greek Yogurt: While you can use lower-fat options, full-fat Greek yogurt creates the creamiest, richest filling. It also contributes to better setting and a more satisfying mouthfeel. Strain your Greek yogurt through a cheesecloth if it seems too thin; thicker yogurt yields a firmer cheesecake.
- Chill Time is Key: Do not rush the chilling process. A minimum of 4 hours, or even better, overnight, allows the cheesecake filling to set properly. This prevents a runny or gooey texture and lets the flavors deepen and meld beautifully. Patience pays off here!
- Don’t Overmix: Once you add the protein powder and yogurt, mix just until everything is combined and smooth. Overmixing can incorporate too much air, which can sometimes lead to a less dense, almost fluffy texture that might not set as firmly.
- Adjust Sweetness to Taste: Different protein powders have varying levels of sweetness. Taste your filling before spooning it into the jars. If you prefer it sweeter, add more powdered sugar or your chosen sweetener. If it’s too sweet, a tiny squeeze more lemon juice can help balance it out.
- Presentation Matters: If you’re serving these to guests or just want a pretty treat for yourself, use a piping bag with a wide tip to add the filling to the jars. This creates a much neater, more professional-looking layer than simply spooning it in.
- Quality Protein Powder: The type of protein powder affects the taste and texture. I prefer a vanilla whey protein, but a casein protein can also work well, sometimes creating an even thicker texture. Ensure you like the taste of your chosen protein powder on its own, as its flavor will come through in the cheesecake.
Storage & Reheating Tips
One of the best qualities of these High Protein Cheesecake Jars is their excellent make-ahead and storage capabilities. They are perfect for meal prepping healthy treats throughout the week. Knowing how to store them properly ensures you enjoy fresh, delicious cheesecake every time.
Refrigerator Storage
Store your assembled High Protein Cheesecake Jars in the refrigerator. Make sure each jar has a tight-fitting lid or cover them securely with plastic wrap. This prevents them from absorbing any odors from other foods in your fridge and keeps them fresh.
They will stay delicious for up to 4-5 days. The flavors actually deepen over time, so they often taste even better a day or two after assembly!
Freezer Storage (Optional)
Yes, you can freeze these High Protein Cheesecake Jars! For longer storage, freeze them before adding any fresh fruit toppings. Ensure the jars are airtight.
They will last in the freezer for up to 1-2 months. When you’re ready to enjoy one, transfer a jar to the refrigerator to thaw overnight. Alternatively, you can let it sit at room temperature for 1-2 hours for a slightly softer, still-chilled treat. Once thawed, add your fresh toppings and enjoy.
Best Enjoyed Chilled
These cheesecake jars are truly meant to be enjoyed cold. There’s no need for “reheating” in the traditional sense. In fact, heating them would ruin their creamy texture.
Simply pull them from the fridge, add your toppings, and dig in. If you’ve frozen them, ensure they are fully thawed before eating to appreciate their intended texture and flavor.
What to Serve With This Recipe
These High Protein Cheesecake Jars are incredibly versatile. They truly stand alone as a satisfying dessert, a wholesome breakfast, or a power-packed snack. However, sometimes you want to round out the experience or pair them with something equally delightful. Here are a few ideas:
As a light but fulfilling breakfast, these jars provide a great start to your day. Pair them with a simple black coffee or a refreshing glass of unsweetened iced tea. For an extra boost of protein and fiber in the morning, consider making my Peanut Butter Overnight Oats alongside these jars for variety throughout the week. You’ll be fueled and ready for anything!
If you enjoy these jars as a dessert, they beautifully complement a lighter dinner. Imagine finishing a delicious and healthy meal like my Smash Burger Tacos or a refreshing High Protein Pasta Salad with one of these creamy treats. The balance of savory and sweet feels just right, providing satisfaction without any heaviness.
For a complete healthy meal plan, these jars fit perfectly. Enjoy them after a hearty dish like my Hot Honey Chicken Bowls for a balanced finish to your day. You can also offer a variety of toppings alongside the jars, like a bowl of mixed berries, toasted coconut flakes, or a drizzle of dark chocolate sauce, allowing everyone to customize their own perfect indulgence.
FAQs
What makes these cheesecake jars high protein?
These delicious High Protein Cheesecake Jars get their impressive protein content primarily from two key ingredients: plain Greek yogurt and vanilla protein powder. Greek yogurt naturally contains significantly more protein than regular yogurt, and when combined with a quality protein powder, it transforms a typical dessert into a muscle-building, satiety-boosting treat. Each jar delivers a substantial amount of protein, making them perfect for a healthy snack or post-workout recovery.
Can I make these High Protein Cheesecake Jars dairy-free or vegan?
Absolutely! You can easily adapt these High Protein Cheesecake Jars for dairy-free or vegan diets. Simply swap out the traditional cream cheese for a plant-based cream cheese alternative.
For the Greek yogurt, choose a thick, plain dairy-free yogurt like an almond, cashew, or coconut-based Greek-style yogurt. Ensure your protein powder is also plant-based (e.g., pea protein or a vegan blend). Use dairy-free butter for the crust, or an oil like coconut oil, and confirm your graham cracker crumbs are vegan-friendly. The taste and texture will remain wonderfully creamy and delicious.
How long do High Protein Cheesecake Jars last in the refrigerator?
Once assembled, your High Protein Cheesecake Jars will remain fresh and delightful in the refrigerator for up to 4 to 5 days. Make sure to keep them in airtight containers or with tight-fitting lids. This prevents them from drying out or absorbing any unwanted flavors from other foods. In fact, many people find that the flavors of these no-bake cheesecakes deepen and meld even better after a day or two in the fridge, making them a fantastic make ahead option for meal prep.
What kind of protein powder works best for these jars?
For these High Protein Cheesecake Jars, a good quality vanilla whey protein powder is usually my top recommendation. Whey protein blends smoothly and typically has a pleasant, mild flavor that complements the cheesecake well. However, you can also use casein protein powder, which often creates an even thicker, more pudding-like texture.
If you prefer a plant based option, a vanilla pea protein or a vegan protein blend works too, but be aware that some plant based proteins can have a stronger flavor or slightly different texture. Always choose a protein powder whose taste you genuinely enjoy, as its flavor will certainly shine through in your finished cheesecake jars.
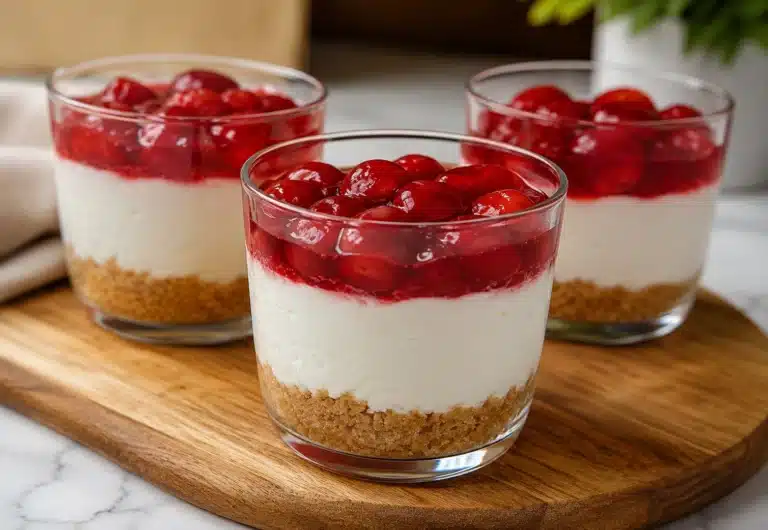
High Protein Cheesecake Jars
These High Protein Cheesecake Jars are a no-bake, guilt-free dessert or snack made with Greek yogurt, cream cheese, and vanilla protein powder, layered over a buttery graham cracker crust. Perfect for busy families, they deliver a creamy, tangy cheesecake flavor with a protein boost, customizable with various toppings.
- Total Time: 4 hours 15 minutes (includes chilling time)
- Yield: 4 jars 1x
Ingredients
For the Crust: 1 cup graham cracker crumbs
4 tbsp melted unsalted butter
1 tbsp granulated sugar (optional)
For the Filling: 2 cups plain Greek yogurt (full-fat recommended)
8 oz cream cheese (softened, full-fat or light)
1/2 cup (2 scoops) vanilla protein powder
1/4 cup powdered sugar (or maple syrup/honey, to taste)
1 tsp vanilla extract
1 tbsp lemon juice (freshly squeezed)
For Topping (Optional): 1 cup fresh berries
as desired sugar-free whipped cream
as desired chocolate shavings
Instructions
1. In a medium bowl, combine graham cracker crumbs, melted butter, and optional sugar; stir until crumbs are evenly moistened and resemble wet sand.
2. Divide crust mixture evenly among four 8-ounce mason jars or dessert cups; press firmly into the bottom of each jar using the back of a spoon or fingertips. Place jars in refrigerator to chill while preparing filling.
3. In a large mixing bowl, beat softened cream cheese with an electric mixer (or whisk) until smooth and creamy, with no lumps.
4. Add Greek yogurt, vanilla protein powder, powdered sugar (or chosen sweetener), vanilla extract, and lemon juice to the cream cheese.
5. Beat on medium speed until thoroughly combined and filling is smooth and fluffy; scrape down sides of bowl as needed. Taste and adjust sweetness or lemon tang if desired.
6. Spoon or pipe the cheesecake filling evenly over the chilled crusts in each jar; gently tap jars on counter to settle filling and remove air bubbles.
7. Cover jars with lids or plastic wrap; refrigerate for at least 4 hours, or preferably overnight, to set properly.
8. Before serving, top with fresh berries, whipped cream, chocolate shavings, or other desired toppings. Enjoy chilled.
Notes
Soften cream cheese for 30-60 minutes before starting to ensure a smooth filling. Use full-fat Greek yogurt for creamiest texture. Chilling time is crucial for proper setting; do not rush. For dairy-free or vegan versions, use plant-based cream cheese, yogurt, and butter, plus a plant-based protein powder. Adjust sweetness based on your protein powder’s sugar content. Store in the refrigerator for up to 4-5 days; can be frozen (without fresh fruit toppings) for up to 2 months.
- Prep Time: 15 minutes
- Cook Time: 0 minutes
- Category: Dessert, Snack, Breakfast
- Method: No-bake, Layering
- Cuisine: American
- Diet: Vegetarian (can be made dairy-free or vegan with substitutions)
Nutrition
- Serving Size: 1 jar (8 oz)
- Calories: 420
- Sugar: 24 g
- Sodium: 380 mg
- Fat: 22 g
- Saturated Fat: 12 g
- Unsaturated Fat: 8 g
- Trans Fat: 0.5 g
- Carbohydrates: 35 g
- Fiber: 2 g
- Protein: 28 g
- Cholesterol: 75 mg