Listen, as a mom of three, I live for those moments when dinner is a win win: delicious and easy. You know the drill, right? Crazy after school schedules, sports practices, homework battles… by the time 5 PM rolls around, my brain often feels like scrambled eggs.
But then, a little lightbulb went off, and I discovered the magic of Air Fryer Chicken Caesar Wraps. Oh, friends, these wraps aren’t just a meal; they’re a lifesaver. They pack all the classic Caesar flavors we adore into a convenient, handheld package, and best of all, the air fryer does most of the heavy lifting.
My kids absolutely devour them, and honestly, so do my husband and I. It’s a simple recipe, yet it feels special, making even the busiest weeknights feel a little more gourmet without any of the fuss. You’re going to love how quickly these Air Fryer Chicken Caesar Wraps come together and how much joy they bring to your table.
Get ready to transform your dinner routine with this incredibly satisfying and wonderfully simple recipe. It truly hits the spot every single time!
Print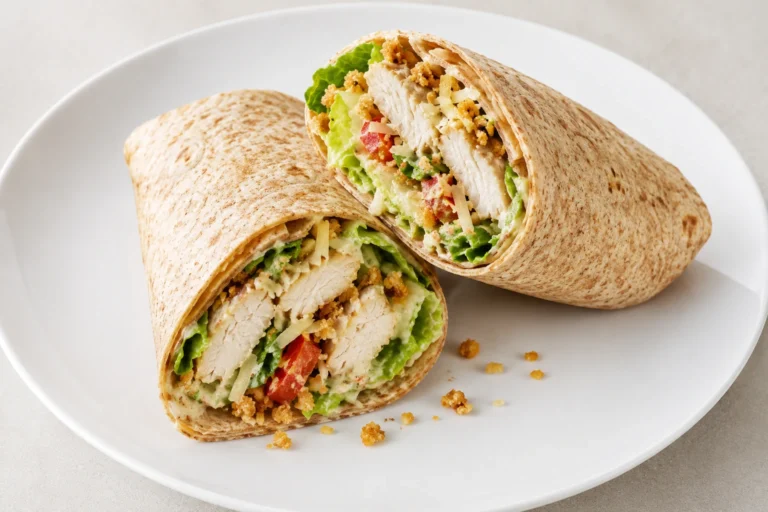
Air Fryer Chicken Caesar Wraps
Air Fryer Chicken Caesar Wraps are a quick, easy, and delicious weeknight dinner. Juicy, seasoned chicken breasts are air-fried to perfection, then combined with crisp romaine lettuce, creamy Caesar dressing, Parmesan cheese, and crunchy croutons, all wrapped in a warm flour tortilla. This recipe is a family-friendly lifesaver that feels gourmet with minimal fuss, perfect for busy schedules.
- Total Time: 29 minutes
- Yield: 4–6 wraps 1x
Ingredients
For the Air Fryer Chicken:
2 boneless, skinless chicken breasts (about 1 lb total)
1 tbsp olive oil
1 tsp garlic powder
1/2 tsp onion powder
1/2 tsp smoked paprika
1/2 tsp salt (or to taste)
1/4 tsp black pepper (or to taste)
For the Caesar Wrap Filling:
4 cups chopped romaine lettuce
1/2 cup Caesar dressing (your favorite brand or homemade)
1/4 cup shredded or shaved Parmesan cheese
1/2 cup crushed croutons (optional, but recommended for crunch)
For Assembling:
4–6 large flour tortillas (burrito size, 10–12 inches)
Instructions
1. 1. Pat the chicken breasts dry with paper towels. This helps the seasoning adhere and promotes even cooking.
2. 2. In a medium bowl, drizzle the chicken breasts with olive oil. Sprinkle with garlic powder, onion powder, smoked paprika, salt, and black pepper. Use your hands to rub the seasoning evenly over all surfaces.
3. 3. Preheat your air fryer to 375°F (190°C) for 3-5 minutes.
4. 4. Place the seasoned chicken breasts in a single layer in the air fryer basket. Do not overcrowd; cook in batches if necessary. Air fry for 10-14 minutes, flipping halfway through, until the internal temperature reaches 165°F (74°C).
5. 5. Remove the chicken and let it rest on a cutting board for 5 minutes before slicing or dicing. Slice into strips or chop into bite-sized pieces.
6. 6. In a large bowl, combine the chopped romaine lettuce, Caesar dressing, Parmesan cheese, and crushed croutons (if using). Toss gently until evenly coated.
7. 7. Warm the tortillas briefly in a dry skillet, microwave, or over a gas flame to make them pliable.
8. 8. Lay a warmed tortilla flat. Spoon a generous portion of the Caesar salad mix onto the center, leaving space around the edges. Arrange some of the chicken on top.
9. 9. Fold the sides of the tortilla over the filling, then tightly roll from the bottom up to secure the filling.
10. 10. Slice in half if desired and serve immediately.
Notes
Resting the chicken after cooking is crucial for juiciness. Assemble wraps just before serving to prevent sogginess. For meal prep, store components separately. To reheat chicken, use the air fryer at 350°F (175°C) for 3-5 minutes.
- Prep Time: 15 minutes
- Cook Time: 14 minutes
- Category: Main Course
- Method: Air Fryer
- Cuisine: American
- Diet: None specified
Nutrition
- Serving Size: 1 wrap
- Calories: 450
- Sugar: 4 g
- Sodium: 850 mg
- Fat: 22 g
- Saturated Fat: 6 g
- Unsaturated Fat: 14 g
- Trans Fat: 0 g
- Carbohydrates: 35 g
- Fiber: 3 g
- Protein: 30 g
- Cholesterol: 85 mg
Why You’ll Love These Air Fryer Chicken Caesar Wraps
These Air Fryer Chicken Caesar Wraps quickly become a staple in your meal rotation for so many fantastic reasons. First and foremost, they embody everything I believe in: simple, nourishing, and utterly delicious food that brings people together. As a busy mom, I understand the constant juggle.
Therefore, I need meals that deliver big on flavor without demanding hours in the kitchen. These wraps do exactly that.
You’ll appreciate the sheer speed. The air fryer works its magic, cooking chicken breasts to golden-brown perfection in mere minutes. This means you go from raw ingredients to a fully assembled meal faster than ordering takeout.
Furthermore, cleanup is a breeze! Minimal pots and pans translate to more family time and less scrubbing. Just toss your air fryer basket into the dishwasher or give it a quick wash, and you’re done.
Beyond convenience, these wraps offer incredible customization. Every family member can tailor their wrap to their exact liking. Want extra croutons?
Go for it! Prefer specific greens? Absolutely!
This flexibility ensures everyone feels happy and satisfied. Moreover, they are surprisingly nourishing. Lean protein from the chicken, fresh crisp lettuce, and a flavorful dressing create a balanced and fulfilling meal.
You get all the comforting familiarity of a classic Caesar salad in an easy-to-eat format. This recipe truly proves that wholesome eating can also be exciting and incredibly easy for any weeknight dinner.
Ingredients You’ll Need
Gathering your ingredients for these Air Fryer Chicken Caesar Wraps is incredibly straightforward. You probably have most of these items in your pantry and fridge already! We divide the ingredients into three main sections: the star of the show, our air-fried chicken; the classic Caesar components; and the wrap itself. Fresh, good-quality ingredients always make the biggest difference in taste, so choose wisely!
| Category | Ingredient | Quantity |
|---|---|---|
| For the Air Fryer Chicken: | Boneless, skinless chicken breasts | 2 (about 1 lb total) |
| Olive oil | 1 tbsp | |
| Garlic powder | 1 tsp | |
| Onion powder | ½ tsp | |
| Smoked paprika | ½ tsp | |
| Salt | ½ tsp (or to taste) | |
| Black pepper | ¼ tsp (or to taste) | |
| For the Caesar Wrap Filling: | Romaine lettuce | 4 cups, chopped |
| Caesar dressing | ½ cup (your favorite brand or homemade) | |
| Parmesan cheese | ¼ cup, shredded or shaved | |
| Croutons | ½ cup, crushed (optional, but recommended for crunch!) | |
| For Assembling: | Large flour tortillas | 4-6 (burrito size, 10-12 inches) |
[image 2]
Substitutions & Variations
Part of the beauty of these Air Fryer Chicken Caesar Wraps lies in their versatility. You can easily adapt them to suit different tastes, dietary needs, or whatever you happen to have on hand. Don’t feel tied down by the exact recipe; think of it as a delicious starting point!
Chicken Alternatives: While chicken breasts air-fry wonderfully, feel free to use boneless, skinless chicken thighs for extra juiciness. Adjust the cooking time slightly, adding a few minutes as needed. Furthermore, if you’re short on time, pre-cooked rotisserie chicken works beautifully.
Just shred it and toss it with a little seasoning before adding it to your wraps. You can even use leftover grilled chicken or baked chicken. For a vegetarian option, consider crispy baked tofu, roasted chickpeas, or a plant-based chicken substitute cooked in the air fryer.
Dressing Options: Of course, classic Caesar dressing is ideal. However, explore other creamy dressings if you prefer. A Greek yogurt-based dressing lightens things up significantly.
You could also try a ranch dressing for a different flavor profile, or a creamy Italian dressing. For a dairy-free Caesar option, many brands offer excellent alternatives made with aquafaba or cashews.
Cheese Please: Parmesan cheese is traditional, but don’t hesitate to experiment! Crumbled feta cheese adds a briny kick. Shredded mozzarella or a sharp cheddar also works well if that’s what your family loves. For a dairy-free option, use nutritional yeast for a cheesy flavor or a store-bought dairy-free Parmesan alternative.
Add-Ins Galore: This is where you can truly make these wraps your own. Boost the vegetable content with thinly sliced red onion, cherry tomatoes, cucumber, or bell peppers. Avocado slices add a creamy, healthy fat that balances the richness of the dressing.
Crumbled bacon bits are always a welcome addition for extra smoky flavor. For a touch of spice, a pinch of red pepper flakes in the chicken seasoning or a drizzle of hot sauce inside the wrap adds a nice kick. Looking for more protein ideas for other meals? Check out our Hot Honey Chicken Bowls or these amazing Smash Burger Tacos for more inspiration!
Tortilla Choices: Large flour tortillas provide the classic wrap experience. For a gluten-free option, choose gluten-free tortillas. You can also use whole wheat tortillas for added fiber, or even large lettuce cups for a super low-carb version. Simply pile your chicken and Caesar salad mix into sturdy lettuce leaves like butter lettuce or iceberg for a fresh, crunchy bite.
Step-by-Step Instructions
Making these Air Fryer Chicken Caesar Wraps is incredibly simple. We’ll start with the crispy, flavorful chicken, then quickly assemble the wraps. Follow these clear steps for a perfect meal every time!
- Prepare the Chicken: Pat your boneless, skinless chicken breasts dry with paper towels. This step helps the seasoning adhere and promotes even cooking.
- Season the Chicken: In a medium bowl, drizzle the chicken breasts with olive oil. Sprinkle them generously with garlic powder, onion powder, smoked paprika, salt, and black pepper. Use your hands to rub the seasoning evenly over all surfaces of the chicken. Ensure a good coating for maximum flavor.
- Preheat the Air Fryer: Preheat your air fryer to 375°F (190°C) for 3-5 minutes. Preheating ensures consistent cooking and helps achieve that desirable crispy exterior.
- Air Fry the Chicken: Place the seasoned chicken breasts in a single layer in the air fryer basket. Do not overcrowd the basket; cook in batches if necessary. Air fry for 10-14 minutes, flipping the chicken halfway through. Cooking time varies depending on the thickness of your chicken. Cook until the internal temperature reaches 165°F (74°C) with an instant-read thermometer.
- Rest and Slice the Chicken: Remove the cooked chicken from the air fryer and transfer it to a cutting board. Let it rest for 5 minutes before slicing or dicing. Resting allows the juices to redistribute, resulting in more tender and flavorful chicken. Slice the chicken into strips or chop it into bite-sized pieces, whatever you prefer for your wraps.
- Prepare the Caesar Salad Mix: In a large bowl, combine the chopped romaine lettuce, Caesar dressing, shredded Parmesan cheese, and crushed croutons (if using). Toss everything gently until the lettuce is evenly coated with the dressing. You want every bite to have that classic Caesar flavor.
- Warm the Tortillas (Optional but Recommended): Briefly warm your large flour tortillas. You can do this in a dry skillet over medium heat for 15-30 seconds per side, in the microwave for 10-15 seconds, or even directly over a gas flame for a few seconds. Warming makes the tortillas more pliable and less likely to tear when rolled.
- Assemble the Wraps: Lay a warmed tortilla flat. Spoon a generous portion of the Caesar salad mix onto the center of the tortilla, leaving space around the edges. Arrange some of the sliced or diced air-fried chicken on top of the salad mix.
- Roll the Wraps: Fold the sides of the tortilla over the filling slightly, then tightly roll the bottom edge up and over the filling, continuing to roll upwards until you reach the top. Ensure a snug roll to keep all the delicious fillings inside.
- Serve Immediately: Slice the Air Fryer Chicken Caesar Wraps in half if desired, and serve them right away. Enjoy your easy, delicious, and satisfying meal!
[image 3]
Pro Tips for Success
Making these Air Fryer Chicken Caesar Wraps fantastic is incredibly easy, but a few simple tricks elevate them from good to absolutely amazing. As a busy mom, I’ve learned these little hacks save time and ensure consistent deliciousness!
Don’t Overcrowd the Air Fryer: This is perhaps the most crucial air fryer tip. When you place chicken in a single layer with enough space around each piece, the hot air circulates properly. This results in perfectly crispy, evenly cooked chicken.
Overcrowding steams the chicken instead of crisping it, leading to a less desirable texture. If necessary, cook your chicken in two batches.
Pat the Chicken Dry: Before seasoning, always pat your chicken breasts thoroughly dry with paper towels. Excess moisture hinders browning and crisping. A dry surface allows the seasoning to stick better and promotes a beautiful golden crust in the air fryer.
Season Generously: Don’t be shy with the seasonings! Chicken breasts can be a bit bland on their own, so a good coating of garlic powder, onion powder, paprika, salt, and pepper infuses them with flavor. You can even add a pinch of dried Italian herbs or a touch of cayenne for a little kick.
Rest the Chicken: After cooking, let the chicken rest for 5 minutes on a cutting board before slicing. This simple step allows the juices to redistribute throughout the meat, making the chicken incredibly tender and moist. Skipping this step often results in drier chicken.
Crispy Croutons are Key: While optional, crushed croutons add an essential textural element to these wraps. They provide that satisfying crunch we love in a Caesar salad. If you don’t have croutons, a handful of toasted breadcrumbs or even some crushed plain potato chips can offer a similar textural contrast.
Warm Your Tortillas: Take a moment to warm your tortillas before assembling. Warm tortillas become more pliable, making them easier to roll without tearing. They also create a more pleasant eating experience, as they feel fresh and soft rather than cold and stiff. A quick zap in the microwave or a few seconds on a warm skillet works wonders.
Assemble Just Before Serving: To prevent soggy wraps, assemble them right before you plan to eat. The dressing can make the lettuce wilt and the tortillas soggy over time. Keep your chicken, salad mix, and tortillas separate until mealtime for the freshest, crispiest experience.
Master the Roll: For a neat and tight wrap, fold in the sides of the tortilla first, then bring the bottom edge up and over the filling. Tuck it in tightly, then continue rolling upwards. This technique keeps all your delicious fillings securely inside.
Storage & Reheating Tips
Meal prepping is a lifesaver for busy weeknights, and while these Air Fryer Chicken Caesar Wraps are best enjoyed fresh, you can definitely prepare components ahead of time. Proper storage ensures everything stays delicious for future meals!
Storing the Chicken: Cooked air fryer chicken stores beautifully. Allow the chicken to cool completely after cooking and resting. Then, transfer the sliced or diced chicken to an airtight container.
It will keep well in the refrigerator for up to 3-4 days. For longer storage, you can freeze the cooked chicken for up to 2-3 months. Thaw it in the refrigerator overnight before reheating.
Reheating the Chicken: To reheat the chicken, the air fryer is your best friend! Place the cold chicken pieces back into the air fryer basket in a single layer. Air fry at 350°F (175°C) for 3-5 minutes, or until heated through and slightly crispy again.
You can also reheat it in a skillet over medium heat with a little oil, or quickly in the microwave. However, the air fryer yields the best texture.
Storing the Salad Components: Store the chopped romaine lettuce separately from the dressing. Place the chopped lettuce in a large airtight container lined with a paper towel to absorb excess moisture. It will stay crisp for 2-3 days.
Keep the Caesar dressing in a separate airtight container in the refrigerator. Store Parmesan cheese and croutons separately as well, to maintain their texture. Do not dress the lettuce until just before serving.
Assembling for Freshness: The key to avoiding soggy wraps is to assemble them right before you plan to eat. Have all your components ready to go: warm tortillas, reheated chicken, fresh lettuce, and dressing. This way, you get maximum crispness and flavor every time. These steps allow you to enjoy a quick, healthy meal even on the busiest days!
What to Serve With This Recipe
These Air Fryer Chicken Caesar Wraps are a fantastic, complete meal on their own, especially with all that protein and fresh greens. However, sometimes you want a little something extra to round out the plate or to stretch the meal further, especially when feeding a hungry family of three (or more!). Here are some simple, nourishing ideas that pair perfectly:
- Fresh Fruit Salad: A simple bowl of seasonal fruit offers a refreshing contrast to the savory wraps. Think sliced apples, grapes, berries, or melon. It’s light, healthy, and a guaranteed kid-pleaser.
- Crispy Oven Fries or Sweet Potato Fries: For a more indulgent side, a batch of homemade or frozen fries baked until crispy adds a satisfying crunch. The air fryer works great for these too!
- Simple Green Salad: If you want more greens but a different flavor profile than the Caesar, a simple mixed green salad with a light vinaigrette is always a good choice.
- High-Protein Pasta Salad: This is an excellent choice! A refreshing pasta salad with veggies and a light dressing adds carbohydrates and extra protein, making for an even heartier meal. It’s also fantastic for meal prep!
- Vegetable Sticks with Dip: Keep it super simple with carrot sticks, cucumber slices, bell pepper strips, and a side of hummus or ranch dip. Quick, easy, and always a hit with the kids.
- Cup of Soup: A light, creamy tomato soup or a simple vegetable broth soup makes a comforting addition, especially on a cooler evening.
- Chips and Salsa: For a quick and effortless side, a bowl of your favorite tortilla chips with a fresh salsa or guacamole always works!
Remember, the goal is always simple, nourishing, and delicious. Choose a side that fits your family’s preferences and your time constraints. Enjoy building your perfect meal around these incredible Air Fryer Chicken Caesar Wraps!
FAQs About Air Fryer Chicken Caesar Wraps
Can I use pre-cooked chicken for these Air Fryer Chicken Caesar Wraps?
Absolutely! Using pre-cooked chicken, such as rotisserie chicken, makes these Air Fryer Chicken Caesar Wraps even quicker. Simply shred or dice the cooked chicken, toss it with a little seasoning if you like, and then proceed with assembling your wraps. No need for the air fryer chicken cooking step, cutting down on your prep time significantly!
How do I prevent my Air Fryer Chicken Caesar Wraps from getting soggy?
The best way to prevent soggy Air Fryer Chicken Caesar Wraps is to assemble them just before serving. Keep your cooked chicken, prepared salad mix (lettuce, dressing, cheese, croutons), and tortillas stored separately in airtight containers in the refrigerator. When you’re ready to eat, simply warm your tortillas, reheat the chicken if desired, mix your salad, and then assemble. This ensures everything stays fresh and crisp.
What if I don’t have an air fryer for the chicken?
No air fryer? No problem! You can easily cook the seasoned chicken breasts in a skillet on the stovetop over medium-high heat for 5-7 minutes per side, or bake them in the oven at 400°F (200°C) for 20-25 minutes, until they reach an internal temperature of 165°F (74°C). The goal is flavorful, cooked chicken to star in your Caesar wraps.
Can I make Air Fryer Chicken Caesar Wraps gluten-free or dairy-free?
Yes, you can absolutely adapt these Air Fryer Chicken Caesar Wraps! For a gluten-free version, simply use your favorite brand of gluten-free tortillas. For dairy-free, choose a dairy-free Caesar dressing (many brands offer great options) and omit the Parmesan cheese, or use a dairy-free Parmesan alternative or nutritional yeast for a cheesy flavor. These simple substitutions ensure everyone can enjoy this delicious meal.