Oh, those busy afternoons! As a mom of three, I often feel like I’m juggling a million things at once. The school pick up dash, homework battles, and the inevitable “Mom, I’m hungry!” chorus hit me daily.
I used to dread the snack request, envisioning a parade of sugary, processed treats. But then, a few years ago, I stumbled upon a truly magical, simple solution that changed our snack game forever: Raspberry Yogurt Clusters.
I remember the first time I made them. It was a scorching summer day, and the kids were begging for something cold and sweet. I had a tub of Greek yogurt and a punnet of slightly bruised raspberries in the fridge.
A little mixing, a quick freeze, and voilà! Within an hour, they were munching on these delightful, frosty bites. Their eyes lit up, and frankly, so did mine.
No more guilt, just pure, wholesome goodness. These weren’t just a snack; they were a moment of quiet enjoyment, a little burst of joy in a busy day. These frozen yogurt bites quickly became a household favorite.
My kids call them “berry clouds,” and I call them a parenting win. They are simple, nourishing, and just what every busy family needs for a healthy snack or a refreshing treat.
Print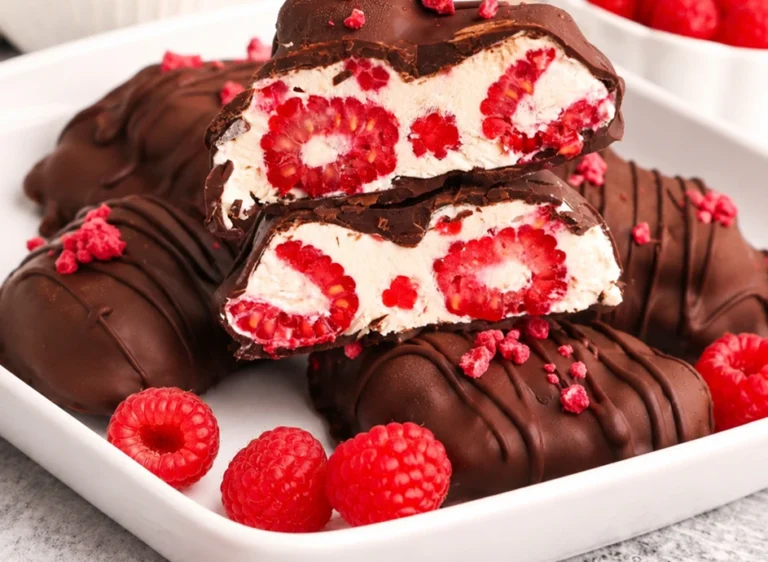
Raspberry Yogurt Clusters
Raspberry Yogurt Clusters are a simple, healthy frozen snack made with Greek yogurt, fresh raspberries, and a touch of sweetener. Perfect for busy families, these no-fuss clusters offer a protein-packed, refreshing treat that can be customized with various toppings.
- Total Time: 2 hours 10 minutes
- Yield: 24 clusters 1x
Ingredients
2 cups plain Greek yogurt (full-fat or low-fat)
1 cup fresh raspberries (washed and dried)
2–4 tablespoons maple syrup or honey
1 teaspoon vanilla extract
Optional: granola, mini chocolate chips, chopped nuts, shredded coconut, chia seeds
Instructions
1. Line a large baking sheet with parchment paper or a silicone mat.
2. In a medium bowl, combine Greek yogurt, maple syrup (or honey), and vanilla extract. Stir until smooth. Taste and adjust sweetness if desired.
3. Gently fold in the dried raspberries, being careful not to overmix.
4. Using a spoon, drop small dollops (about 1.5-2 inches wide) of the mixture onto the prepared baking sheet, leaving space between each cluster.
5. If using optional toppings, sprinkle them over the wet clusters.
6. Place the baking sheet in the freezer and freeze for at least 2-3 hours, until completely solid.
7. Once frozen, peel clusters off the parchment and serve immediately. Store leftovers in an airtight container in the freezer.
Notes
Ensure raspberries are thoroughly dried to avoid icy clusters. For best results, use thick yogurt (Greek or dairy-free alternative). Clusters can be stored in an airtight container in the freezer for up to 1-2 months. Let sit at room temperature for 1-2 minutes for a slightly softer texture.
- Prep Time: 10 minutes
- Cook Time: 0 minutes
- Category: Snack, Dessert
- Method: No-bake
- Cuisine: American
- Diet: Vegetarian, Gluten-free (if using certified GF oats/toppings), Nut-free option available
Nutrition
- Serving Size: 4 clusters (serving size 4 clusters)
- Calories: 120
- Sugar: 12
- Sodium: 35
- Fat: 3
- Saturated Fat: 2
- Unsaturated Fat: 1
- Carbohydrates: 18
- Fiber: 2
- Protein: 8
- Cholesterol: 10
Why You’ll Love These Raspberry Yogurt Clusters
These delightful Raspberry Yogurt Clusters aren’t just a recipe; they are a lifestyle hack for busy parents and anyone seeking wholesome goodness. As Emilia, a mom who believes food is love, I promise you will adore them for so many reasons. First, they are incredibly easy.
We’re talking minimal ingredients and virtually no active cooking time. You simply mix, drop, and freeze. This simplicity means you can whip them up even on your most hectic days.
Secondly, they are incredibly healthy. Packed with protein from Greek yogurt, fiber and antioxidants from fresh raspberries, these clusters provide sustained energy without any sugar crash. They make an excellent alternative to highly processed snacks or sugary desserts. You feel good giving them to your family, and everyone enjoys the delicious taste.
Moreover, these frozen yogurt clusters are unbelievably kid-friendly. My little ones devour them! The vibrant color of the raspberries and the naturally sweet, tangy flavor appeal to even the pickiest eaters.
Plus, their small, bite-sized nature makes them easy for tiny hands to manage. This recipe also offers fantastic versatility. You can easily adapt it to suit your family’s preferences or whatever ingredients you have on hand.
Switch up the fruit, add different toppings, or try a dairy-free yogurt. The possibilities are endless, ensuring these never get boring.
Finally, they are perfect for meal prepping. Make a big batch at the beginning of the week, and you have a grab and go snack ready whenever hunger strikes. They are wonderfully refreshing, especially on a warm afternoon, providing a cool, satisfying treat that genuinely nourishes. These clusters truly embody simple, nourishing food that makes life easier and more delicious.
Ingredients You’ll Need
Creating these delightful Raspberry Yogurt Clusters requires only a handful of simple ingredients. You probably have most of them in your pantry and fridge right now! Quality ingredients make all the difference, so choose your favorites.
| Ingredient | Quantity | Notes |
|---|---|---|
| Plain Greek Yogurt | 2 cups | Full-fat or low-fat, your preference. We love the creamy richness that full-fat Greek yogurt brings to these clusters, making them extra satisfying. |
| Fresh Raspberries | 1 cup | Washed thoroughly and gently patted completely dry. Dry berries prevent icy clusters. Fresh raspberries provide the best flavor and texture. |
| Maple Syrup or Honey | 2-4 tablespoons | Adjust this amount to your desired sweetness. Maple syrup offers a lovely depth, while honey adds a delicate floral note. Agave nectar also works beautifully. |
| Vanilla Extract | 1 teaspoon | A splash of pure vanilla extract elevates all the flavors in the clusters, adding a warm, inviting aroma and taste. Do not skip this! |
| Optional Toppings (choose your favorites!) | As desired | Think granola for crunch, mini chocolate chips for a hint of indulgence, chopped nuts for extra protein, or shredded coconut for tropical flair. |
Each ingredient plays an important role. The Greek yogurt provides a creamy base and a significant protein boost, keeping you full and satisfied. Raspberries infuse the clusters with their sweet tart flavor and a punch of antioxidants and fiber.
The sweetener balances the tartness, creating a harmonious taste profile. Vanilla extract enhances the overall flavor experience, making these clusters truly irresistible. And those optional toppings? They add texture, extra flavor, and a fun element that lets everyone customize their clusters!
[image 2]
Substitutions & Variations
One of the best things about these Raspberry Yogurt Clusters is their incredible adaptability! You can truly make them your own, catering to dietary needs, what’s in season, or simply what your family loves most. Don’t hesitate to experiment with different combinations.
Yogurt Choices: While Greek yogurt provides the best thick and creamy texture, you absolutely have options. If you prefer, use regular plain yogurt, but be aware that the clusters might be a little softer. For dairy-free versions, use almond milk yogurt, coconut milk yogurt, or soy yogurt.
Ensure they are plain and unsweetened to control the sugar content. Thick varieties of dairy-free yogurt will yield the best results.
Berry Swaps: Not a raspberry fan, or just want to mix things up? Almost any berry works beautifully! Try fresh blueberries, chopped strawberries, blackberries, or even a mixed berry blend.
Remember to wash and dry all berries thoroughly before adding them. You can also use frozen berries; simply thaw them completely and drain any excess liquid to prevent your clusters from becoming too icy.
Sweetener Alternatives: Maple syrup and honey are my go to’s, but feel free to use what you have. Agave nectar, stevia drops, or a sugar substitute are all viable options. Adjust the amount to your personal sweetness preference. You can even omit added sweetener entirely if your berries are particularly sweet, or if you prefer a more tart flavor.
Flavor Boosters: A little zest goes a long way! Add a teaspoon of fresh lemon or lime zest to the yogurt mixture for a brighter, more citrusy flavor profile. A pinch of cinnamon or a dash of almond extract could also add unique dimensions. Consider a tiny amount of rosewater for an elegant touch, but use sparingly!
Topping Extravaganza: This is where the fun really begins! For extra crunch, sprinkle with your favorite granola. We often make Peanut Butter Overnight Oats, and the granola we use for that recipe works perfectly here too.
Other great topping ideas include mini chocolate chips (dark chocolate is a lovely contrast), chopped nuts like almonds, walnuts, or pecans, shredded unsweetened coconut, or even a sprinkle of chia seeds for extra omega-3s. A drizzle of melted peanut butter or almond butter after freezing can also add a delightful richness. Let your imagination run wild!
Added Texture & Nutrition: For an even more substantial snack, stir a couple of tablespoons of rolled oats into the yogurt mixture before adding the berries. This gives the clusters a delightful chewiness and extra fiber. A tablespoon of ground flaxseed or chia seeds can also boost the nutritional content without significantly changing the texture.
Step-by-Step Instructions
Making these Raspberry Yogurt Clusters is incredibly straightforward. You will love how quickly they come together, making them perfect for even the busiest of days. Gather your ingredients, and let’s get started!
- Prepare Your Baking Sheet: First, line a large baking sheet with parchment paper or a silicone baking mat. This crucial step prevents the yogurt clusters from sticking and makes for easy removal once frozen.
- Combine Yogurt Mixture: In a medium sized bowl, combine the plain Greek yogurt, maple syrup (or honey), and vanilla extract. Stir everything together gently until it is well combined and smooth. Taste the mixture and adjust the sweetness if desired.
- Add Raspberries: Gently fold in the fresh, thoroughly dried raspberries. You want them distributed throughout the yogurt, but avoid overmixing. We love seeing whole or lightly crushed berries in our clusters, so a light hand is key here.
- Form the Clusters: Using a spoon, scoop small, irregular dollops of the raspberry yogurt mixture onto the prepared baking sheet. Aim for clusters that are roughly 1.5 to 2 inches in diameter. Don’t worry about perfect shapes; the rustic look is part of their charm! Leave a little space between each cluster to prevent them from freezing together.
- Add Optional Toppings: If you are using any optional toppings like granola, mini chocolate chips, or chopped nuts, sprinkle them evenly over the wet yogurt clusters now. They will adhere nicely as the clusters freeze.
- Freeze Until Solid: Carefully transfer the baking sheet to your freezer. Freeze the clusters for at least 2 to 3 hours, or until they are completely solid and firm to the touch. This ensures they hold their shape and have the best texture.
- Serve and Enjoy: Once thoroughly frozen, peel the Raspberry Yogurt Clusters off the parchment paper. Serve them immediately.
[image 3]
Pro Tips for Success
Even though this recipe is incredibly simple, a few professional tips can elevate your Raspberry Yogurt Clusters from good to absolutely amazing. These little tricks ensure perfect texture, flavor, and ease of preparation every single time.
- Line That Sheet Properly: Always use parchment paper or a silicone baking mat. This is non-negotiable! The frozen yogurt will stick mercilessly to an unlined pan, making removal frustrating. Parchment paper allows the clusters to pop right off with ease.
- Dry Those Berries: Water is the enemy of creamy frozen treats. Ensure your raspberries are completely dry after washing. Excess water can lead to icy, less flavorful clusters. Gently pat them with a paper towel.
- Don’t Overmix the Raspberries: You want pockets of raspberries, not a uniformly pink mash. Gently fold them into the yogurt mixture. This creates beautiful streaks of color and provides lovely bursts of fruit in every bite.
- Taste and Adjust Sweetness: Before freezing, taste your yogurt mixture. Raspberries can vary in sweetness and tartness, so you might need a little more or less sweetener than the recipe suggests. Adjust to your personal preference.
- Freeze Until Fully Solid: Patience is a virtue here. For the best texture and to prevent them from turning into a sticky mess, allow the clusters to freeze for the full recommended time, or even longer. They should be rock solid before you attempt to remove them.
- Make a Double Batch: These disappear quickly! They are so popular in my house that I almost always double the recipe. It takes the same amount of effort and ensures you have plenty on hand for snacks throughout the week.
- Get the Kids Involved: This is a fantastic recipe for little helpers! My kids love scooping the yogurt onto the sheet and sprinkling on the toppings. It’s a fun, mess friendly activity that gets them excited about healthy eating.
- Individual Clusters are Key: When spooning out the mixture, try to keep the clusters distinct and not touching too much. This makes them easier to break apart and store individually once frozen.
Storage & Reheating Tips
When it comes to these delightful Raspberry Yogurt Clusters, “reheating” isn’t exactly in their vocabulary! They are meant to be enjoyed frozen. Proper storage ensures they retain their wonderful texture and flavor for weeks to come. Here’s how to keep them fresh and ready to eat whenever a craving strikes.
Immediate Storage After Freezing: Once your Raspberry Yogurt Clusters are completely frozen solid on the baking sheet, carefully peel them off the parchment paper. They should pop off easily. Do not leave them out at room temperature for too long, as they will start to soften quickly.
Airtight Container in the Freezer: Transfer the frozen clusters into a freezer safe, airtight container or a heavy-duty freezer bag. Laying a piece of parchment paper between layers of clusters can prevent them from sticking together, though they generally don’t if fully frozen. Press out any excess air from freezer bags before sealing to help prevent freezer burn.
How Long Do They Last? Stored properly, these Raspberry Yogurt Clusters will maintain their quality in the freezer for up to 1 to 2 months. Beyond that, they might start to develop a bit of freezer burn, which can affect the taste and texture, though they would still be safe to eat.
Serving Straight from the Freezer: The beauty of these clusters is that you enjoy them directly from the freezer! They offer a wonderfully cold and refreshing bite, perfect for cooling down on a warm day or satisfying a sweet craving. If you prefer a slightly softer texture, let them sit at room temperature for just 1-2 minutes before eating. Any longer, and they will become too soft and sticky.
Preventing Freezer Burn: The key to avoiding freezer burn is a good airtight seal. Make sure your container or bag is sealed tightly. Minimizing the air exposure helps to maintain their fresh taste and prevents them from drying out or developing an icy coating.
What to Serve With This Recipe
Raspberry Yogurt Clusters are incredibly versatile. They shine as a standalone snack, but they also complement a variety of meals and occasions. As Emilia, I often integrate them into our day in different ways, adding a touch of healthy sweetness wherever needed.
As a Standalone Snack: This is their primary role! They are perfect for an afternoon pick-me-up when hunger hits but you don’t want anything too heavy. The protein from the yogurt and the fiber from the raspberries make them satisfying and energizing.
A Wholesome Breakfast Component: While they are not a full breakfast on their own, a few clusters make a wonderful addition to your morning meal. Serve them alongside a bowl of Peanut Butter Overnight Oats, scrambled eggs, or a piece of whole-wheat toast. They add a refreshing, fruity element that brightens your plate.
A Light Dessert: Looking for a healthier alternative to ice cream or heavy pastries? These Raspberry Yogurt Clusters are your answer. They satisfy a sweet tooth without the guilt, offering a cool, creamy, and fruity finish to any meal.
Post-Workout Refreshment: The protein in the Greek yogurt makes these an excellent choice for a post-workout snack. They help with muscle recovery and provide a refreshing burst of energy after physical activity.
Pairing with Savory Meals: While not a direct side dish, these clusters can offer a lovely contrast to heartier savory meals. Imagine enjoying a refreshing cluster after a delicious meal like Smash Burger Tacos or Hot Honey Chicken Bowls. The cool, sweet-tartness provides a perfect palate cleanser and a light, satisfying end to your meal. They can also complement a protein-rich lunch like High-Protein Pasta Salad, serving as a sweet finish.
On a Snack Board: Hosting friends or having a family gathering? Add a bowl of these Raspberry Yogurt Clusters to a snack or dessert board. They provide a beautiful pop of color and a delightful option for everyone to enjoy. They look sophisticated but are secretly so simple to make!
FAQs About Raspberry Yogurt Clusters
Can I use frozen raspberries for Raspberry Yogurt Clusters?
Yes, absolutely! If using frozen raspberries, make sure to thaw them completely first. Once thawed, drain any excess liquid very well.
This step is important because extra water can make your clusters icy rather than creamy. Gently pat the thawed berries dry with a paper towel before folding them into the yogurt mixture.
How long do Raspberry Yogurt Clusters last in the freezer?
When stored properly in an airtight freezer-safe container or bag, these Raspberry Yogurt Clusters will keep well in the freezer for up to 1 to 2 months. Beyond that, they might start to develop freezer burn, which can affect their texture and flavor, but they generally remain safe to eat.
Are Raspberry Yogurt Clusters healthy?
Yes, they are incredibly healthy! These clusters are packed with protein from Greek yogurt, which helps keep you full and satisfied. Raspberries provide essential vitamins, fiber, and antioxidants. With customizable sweetness, you can control the sugar content, making them a much healthier alternative to many processed snacks and desserts.
Can I make these dairy-free?
Definitely! You can easily make these Raspberry Yogurt Clusters dairy-free. Simply substitute the plain Greek yogurt with your favorite plant based yogurt alternative.
Good options include almond milk yogurt, coconut milk yogurt, or soy yogurt. For the best texture, choose a thick, plain, unsweetened variety.
What if my yogurt clusters are too sticky?
If your Raspberry Yogurt Clusters are too sticky, it usually means they haven’t frozen completely or have started to thaw. Ensure they freeze for the full recommended time (2-3 hours) or until rock solid. Also, always use parchment paper or a silicone baking mat on your baking sheet; this prevents sticking and allows for easy removal. If they become sticky while eating, try letting them sit out for just a minute or less before enjoying.
Can kids help make these Raspberry Yogurt Clusters?
Absolutely! This is a fantastic recipe for getting kids involved in the kitchen. My own children love helping to mix the ingredients, scoop the yogurt onto the baking sheet, and sprinkle on the toppings. It’s a simple, low-mess activity that encourages healthy eating habits and makes cooking fun for the whole family.