The scent of vanilla wafers and ripe bananas always takes me back. It’s a magical shortcut to cherished holiday memories. I remember one frantic Christmas Eve, the kids were buzzing with anticipation, and my usual elaborate dessert plan completely derailed.
My youngest, Leo, had spilled a carton of milk everywhere, and my eldest, Mia, was trying to “help” by adding extra glitter to everything, including the kitchen counter. I needed a hero dessert, something simple, quick, and utterly delicious. That’s when I threw together this beautiful creation: the Strawberry Banana Pudding Dream Holiday No-bake Dessert. It saved the day, and honestly, it’s been a family tradition ever since.
This dessert isn’t just easy; it’s a hug in a bowl, a vibrant burst of flavor that screams holiday cheer without any oven stress. As a mom of three, I live for recipes that deliver big on taste with minimal fuss. And this no-bake strawberry banana pudding absolutely fits the bill.
It’s layered with creamy pudding, fresh strawberries, sweet bananas, and crunchy vanilla wafers. Every spoonful is pure bliss. Moreover, it is the perfect make ahead treat, freeing you up to enjoy those precious moments with your loved ones. Forget complicated baking; embrace the simplicity and joy of this delightful holiday dessert.
Print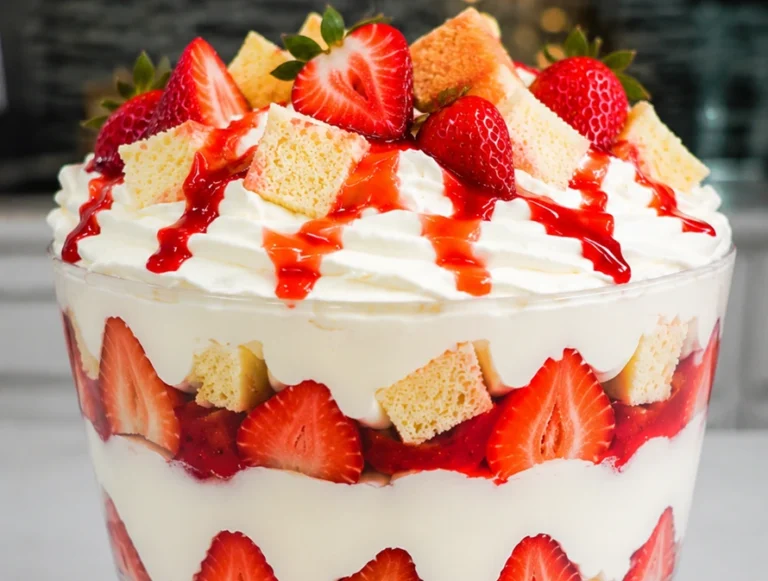
Strawberry Banana Pudding Dream Holiday No-bake Dessert
This Strawberry Banana Pudding Dream Holiday No-bake Dessert is a quick, easy, and utterly delicious layered dessert featuring creamy vanilla pudding, fresh strawberries, ripe bananas, and crunchy vanilla wafers, topped with homemade whipped cream. Perfect for holiday gatherings or any occasion, it requires no oven and can be made ahead for stress-free entertaining.
- Total Time: 4 hours 20 minutes (including chilling)
- Yield: 12 servings
Ingredients
Vanilla Wafers: 1 (11-ounce) box
Fresh Strawberries: 2 cups, washed, hulled, and sliced
Ripe Bananas: 3-4 medium, sliced into rounds
Instant Vanilla Pudding Mix: 2 (3.4-ounce) boxes
Cold Milk: 4 cups (whole milk recommended)
Heavy Whipping Cream: 2 cups
Powdered Sugar: 1/4 cup (or to taste)
Vanilla Extract: 1 teaspoon
Instructions
1. 1. Prepare the Pudding: In a large mixing bowl, whisk together the two boxes of instant vanilla pudding mix and 4 cups of cold milk. Whisk vigorously for about 2 minutes until the mixture thickens. Set aside.
2. 2. Prepare the Whipped Cream: In a separate, chilled mixing bowl, combine the heavy whipping cream, powdered sugar, and vanilla extract. Beat with an electric mixer on high speed until stiff peaks form. Do not overbeat.
3. 3. Slice the Fruit: Wash, hull, and slice the strawberries. Peel and slice the bananas into rounds. Keep separate.
4. 4. First Layer of Wafers: Arrange a single layer of vanilla wafers at the bottom of a 9×13-inch baking dish. Break some to fill gaps.
5. 5. First Layer of Bananas: Evenly distribute about half of the sliced bananas over the wafers.
6. 6. First Layer of Pudding: Carefully spread about half of the prepared pudding over the bananas.
7. 7. First Layer of Strawberries: Arrange about half of the sliced strawberries over the pudding.
8. 8. Second Layer of Wafers: Place another layer of vanilla wafers over the strawberries.
9. 9. Second Layer of Bananas: Add the remaining sliced bananas over the wafers.
10. 10. Second Layer of Pudding: Spread the remaining pudding over the bananas.
11. 11. Whipped Cream Topping: Gently spread all of the whipped cream over the final pudding layer.
12. 12. Garnish and Chill: Decorate the top with the remaining strawberries and a few extra wafers. Cover loosely with plastic wrap and refrigerate for at least 4 hours, preferably overnight, before serving.
Notes
For best results, use cold milk for the pudding and chill the bowl for the whipped cream. To prevent bananas from browning, toss them in a little lemon juice before layering. The dessert needs at least 4 hours to chill so the wafers soften. Store leftovers covered in the refrigerator for up to 2-3 days; freezing is not recommended.
- Prep Time: 20 minutes
- Cook Time: 0 minutes
- Category: Dessert
- Method: No-bake
- Cuisine: American
- Diet: Vegetarian
Nutrition
- Serving Size: 1 serving (approx. 1/12 of recipe)
- Calories: 415
- Sugar: 40 g
- Sodium: 520 mg
- Fat: 22 g
- Saturated Fat: 13 g
- Unsaturated Fat: 7 g
- Trans Fat: 0 g
- Carbohydrates: 52 g
- Fiber: 2 g
- Protein: 5 g
- Cholesterol: 75 mg
Why You’ll Love This Strawberry Banana Pudding Dream Holiday No-bake Dessert
You are going to adore this recipe for so many reasons. First, it’s incredibly simple to prepare. No oven, no complex techniques, just straightforward layering.
This means less time in the kitchen and more time enjoying your family and friends during the busy holiday season. Busy moms, I know you understand the value of that!
Second, the flavor profile is utterly irresistible. The classic combination of sweet bananas and creamy vanilla pudding gets a vibrant, fresh twist from juicy strawberries. This adds a delightful tartness that perfectly balances the sweetness. Each bite offers a harmonious blend of textures too: the soft pudding, the tender fruit, and the satisfying crunch of vanilla wafers.
Furthermore, this no-bake dessert is a crowd pleaser. Seriously, I have never met anyone who didn’t fall head over heels for it. Kids love the familiar taste and vibrant colors, and adults appreciate its nostalgic charm and elegant presentation.
It’s perfect for any holiday gathering, from a casual family dinner to a more formal celebration. You can easily scale it up for a larger crowd or prepare individual servings for a personalized touch.
Additionally, it is a fantastic make-ahead option. You assemble it, let it chill, and it’s ready when you are. This reduces last minute stress significantly.
Imagine having a show stopping dessert waiting for you, allowing you to focus on other aspects of your holiday preparations, like decorating or just spending quality time with your kids. It truly simplifies holiday entertaining. We even love it for a simple weeknight treat, especially after a delicious dinner like these Smash Burger Tacos.
Ultimately, this Strawberry Banana Pudding Dream Holiday No-bake Dessert embodies everything I believe about food: it brings joy, creates memories, and doesn’t have to be complicated to be absolutely wonderful. Give it a try; your taste buds and your holiday schedule will thank you!
Ingredients You’ll Need
Gathering your ingredients is the first step to creating this dreamy dessert. You’ll find most of these staples easily at your local grocery store. I always keep a few of these on hand, especially during the holidays, for impromptu dessert cravings or unexpected guests. Fresh is best for the fruit, but otherwise, standard pantry items work perfectly.
| Ingredient | Quantity | Notes |
|---|---|---|
| Vanilla Wafers | 1 (11-ounce) box | Or similar plain cookies/biscuits |
| Fresh Strawberries | 2 cups | Washed, hulled, and sliced |
| Ripe Bananas | 3-4 medium | Sliced into rounds |
| Instant Vanilla Pudding Mix | 2 (3.4-ounce) boxes | Or sugar-free vanilla pudding mix |
| Cold Milk | 4 cups | Whole milk works best for creaminess |
| Heavy Whipping Cream | 2 cups | For homemade whipped cream |
| Powdered Sugar | 1/4 cup | Or to taste, for whipped cream |
| Vanilla Extract | 1 teaspoon | For homemade whipped cream |
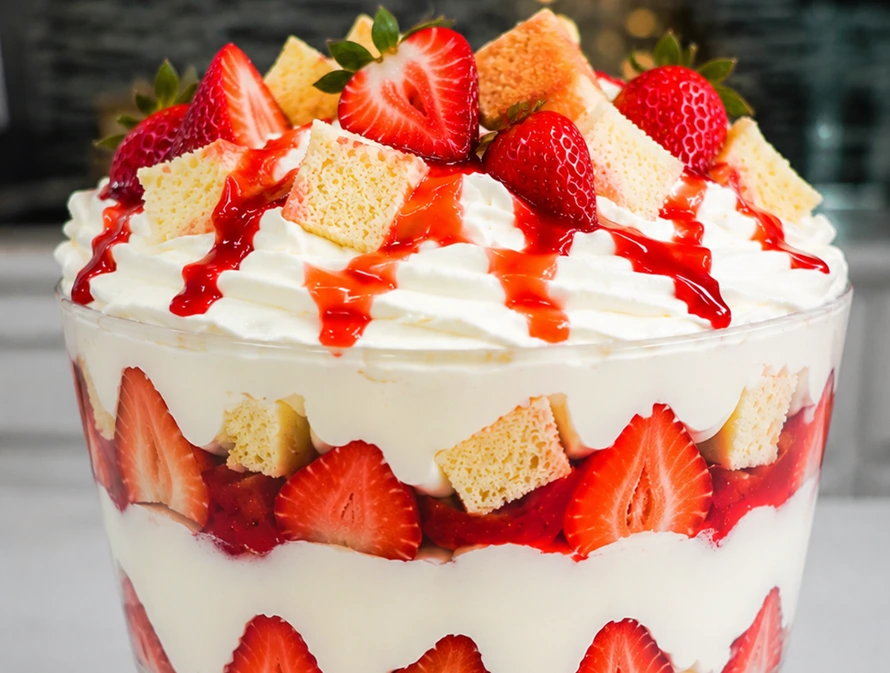
Make sure your bananas are ripe but not overly mushy; you want them sweet but still firm enough to hold their shape. The strawberries should be vibrant red and juicy. Using cold milk for the pudding helps it set quickly and creates a wonderfully thick, luscious texture. You are now ready to begin assembling your masterpiece!
[image 2]
Substitutions & Variations
One of the best things about simple recipes is their adaptability. This Strawberry Banana Pudding Dream Holiday No-bake Dessert is incredibly versatile, allowing you to tailor it to your preferences, dietary needs, or whatever you have on hand. Don’t hesitate to get creative!
If you don’t have vanilla wafers, try other plain cookies. Graham crackers, shortbread cookies, or even digestive biscuits work beautifully. For a gluten-free version, use gluten free vanilla wafers or a crumbled gluten-free shortbread. The texture will be slightly different, but the flavor will still shine.
Want to change up the fruit? Absolutely! Consider blueberries, raspberries, or even sliced peaches when they are in season.
A mix of berries could be lovely. Just be sure to pat any very juicy fruits dry before adding them to prevent the pudding from becoming watery. You could also add a sprinkle of toasted coconut flakes for a tropical twist, or chopped nuts like pecans or walnuts for extra crunch and a nutty flavor profile.
For the pudding, while vanilla is classic, feel free to experiment with other instant pudding flavors. Banana cream pudding would intensify the banana flavor, or even a cheesecake flavored pudding for a richer experience. If you prefer a dairy-free option, use almond milk or oat milk with a dairy-free instant pudding mix. Also, ensure your whipped cream is made with a dairy free alternative like coconut cream (make sure it’s well chilled so it whips properly).
Instead of making homemade whipped cream, you can use a store-bought whipped topping for convenience. However, I always find that homemade whipped cream tastes so much better and really elevates the dessert. You control the sweetness, too!
Finally, consider a drizzle of chocolate sauce or a sprinkle of mini chocolate chips between layers for the chocolate lovers in your life. A touch of cinnamon or nutmeg in the pudding mixture can also add a warm, cozy, holiday spice note. Feel free to adjust the amount of powdered sugar in the whipped cream based on your sweet tooth. This recipe truly invites personalization!
Step-by-Step Instructions
Making this Strawberry Banana Pudding Dream Holiday No-bake Dessert is super straightforward. Follow these steps, and you’ll have a stunning and delicious dessert ready for your holiday table with minimal effort. This process is truly designed for ease and enjoyment.
- Prepare the Pudding: In a large mixing bowl, whisk together the two boxes of instant vanilla pudding mix and 4 cups of cold milk. Whisk vigorously for about 2 minutes until the mixture thickens. It will become quite firm. Set this aside to continue setting while you prepare the other components.
- Prepare the Whipped Cream: In a separate, chilled mixing bowl, combine the heavy whipping cream, powdered sugar, and vanilla extract. Beat with an electric mixer on high speed until stiff peaks form. Be careful not to overbeat, or you will end up with butter.
- Slice the Fruit: Wash, hull, and slice your fresh strawberries. Peel and slice your ripe bananas into rounds. Keep them separate for easy layering.
- First Layer of Wafers: Arrange a single layer of vanilla wafers at the bottom of a 9×13-inch baking dish. You might need to break some to fit any gaps, creating a solid base.
- First Layer of Bananas: Evenly distribute about half of your sliced bananas over the vanilla wafers.
- First Layer of Pudding: Carefully spread about half of the prepared vanilla pudding over the bananas. Use an offset spatula or the back of a spoon to create an even layer.
- First Layer of Strawberries: Arrange about half of your sliced strawberries over the pudding layer.
- Second Layer of Wafers: Place another layer of vanilla wafers over the strawberries.
- Second Layer of Bananas: Add the remaining sliced bananas over the wafers.
- Second Layer of Pudding: Spread the remaining vanilla pudding over the bananas.
- Whipped Cream Topping: Gently spread all of the prepared whipped cream over the final layer of pudding. Make sure it covers the entire surface.
- Garnish and Chill: Decorate the top with the remaining fresh strawberries, perhaps arranging them in an attractive pattern. You can also add a few extra vanilla wafers for garnish. Cover the dish loosely with plastic wrap and refrigerate for at least 4 hours, or preferably overnight. This chilling time allows the pudding to set completely and the wafers to soften, creating that wonderful pudding texture.
That’s it! Your delicious Strawberry Banana Pudding Dream Holiday No-bake Dessert is ready to impress. The anticipation during the chilling time is the hardest part, but it is absolutely worth the wait!
[image 3]
Pro Tips for Success
As a mom who’s made her share of puddings and desserts, I’ve picked up a few tricks to ensure this Strawberry Banana Pudding Dream Holiday No-bake Dessert turns out perfectly every time. These small details can make a big difference in flavor and texture.
Chill Your Bowl and Whisk for Whipped Cream: For the fluffiest homemade whipped cream, always chill your mixing bowl and whisk attachment in the freezer for 10-15 minutes before you start. This helps the cream whip up faster and hold its peaks better. A cold environment prevents the cream from warming up too quickly.
Use Cold Milk for Pudding: Similarly, use very cold milk for your instant pudding. Cold milk helps the pudding set faster and achieve a firmer, creamier consistency. If your milk is lukewarm, the pudding might remain slightly runny.
Don’t Overmix Pudding: While you need to whisk the pudding vigorously, stop as soon as it thickens. Overmixing can sometimes make instant pudding gritty. Just whisk until no dry pockets remain and it reaches a good, thick consistency.
Prevent Bananas from Browning: Bananas notoriously brown quickly when exposed to air. To slow this process, you can lightly toss your sliced bananas in a tiny amount of lemon juice (about 1 teaspoon for all the bananas) before layering. This won’t affect the flavor significantly but will keep them looking fresh. However, if you are serving it within a day or two, it’s not strictly necessary.
Allow Ample Chill Time: This is perhaps the most crucial tip! The dessert absolutely needs those 4 hours (preferably overnight) in the refrigerator. This time allows the pudding to fully set, the flavors to meld, and the vanilla wafers to soften into that perfect cake-like texture that defines a great banana pudding.
Rushing this step will result in a less cohesive and enjoyable dessert. I even prepare mine the day before a holiday gathering, just like I might prep ingredients for High-Protein Pasta Salad.
Arrange Neatly for Presentation: Since this is a layered dessert, take a moment to arrange your fruit and wafers neatly, especially the top layer. A beautiful presentation always makes the dessert more enticing. Consider fanning out the strawberry slices on top for an elegant finish.
Taste and Adjust: When making the whipped cream, taste it before you add all the powdered sugar. Adjust the sweetness to your liking. Some prefer it less sweet to balance the sugary pudding and fruit.
By following these simple tips, you will create a truly spectacular no-bake holiday dessert that tastes as wonderful as it looks!
Storage & Reheating Tips
This Strawberry Banana Pudding Dream Holiday No-bake Dessert is best enjoyed fresh, but it stores remarkably well for a few days. Since it’s a no-bake, chilled dessert, “reheating” isn’t a concern; it’s all about proper storage to maintain its deliciousness.
Refrigeration is Key: Always store any leftover pudding tightly covered in the refrigerator. Use plastic wrap pressed directly onto the surface of the whipped cream, or use an airtight container. This prevents the pudding from absorbing odors from other foods in your fridge and keeps the fruit fresh.
How Long Does It Last? Properly stored, this dessert will remain delicious for 2-3 days. Beyond that, the bananas might start to brown significantly, and the wafers could become too soggy.
While still edible, the texture and appearance might not be as appealing. I often prepare things like Peanut Butter Overnight Oats for a few days, so I understand the importance of good fridge storage.
Can You Freeze It? I generally do not recommend freezing this particular dessert. The texture of the bananas and strawberries can become mushy and watery once thawed.
Additionally, the pudding and whipped cream can separate, leading to a less appealing consistency. This is truly a fresh-serve or short-term refrigerated dessert.
Serving Leftovers: Simply take the dish out of the refrigerator and serve chilled. There’s no special preparation needed for leftovers other than uncovering and dishing out. It tastes just as good on day two!
To avoid excessive leftovers for smaller gatherings, consider making the recipe in individual serving dishes like mason jars or small trifle bowls. This makes portion control easy and ensures each serving remains perfectly intact and fresh. This dessert is so delightful, though, that you might not have any leftovers to worry about!
What to Serve With This Recipe
This Strawberry Banana Pudding Dream Holiday No-bake Dessert is a star on its own, but it also pairs beautifully with a range of dishes, especially during the holidays. Think about balancing its sweetness and creaminess with complementary flavors and textures.
For a holiday meal, serve this pudding after a hearty main course. A roasted turkey or ham dinner with all the fixings would be perfectly followed by this light and refreshing dessert. The vibrant fruit provides a nice contrast to the richness of a traditional holiday meal.
If you are hosting a more casual get-together, this dessert shines after a lighter meal. Think grilled chicken or fish, or even a flavorful bowl like my Hot Honey Chicken Bowls. The pudding offers a sweet, satisfying conclusion without feeling too heavy. It’s also fantastic after a casual backyard barbecue, providing a cool, creamy finish to smoky flavors.
Consider offering a hot beverage alongside the dessert. A warm cup of coffee, decaf tea, or a rich hot chocolate can be the perfect accompaniment, especially on a chilly holiday evening. The warmth of the drink provides a comforting contrast to the cold, creamy pudding.
For those who love a bit of extra indulgence, a small scoop of vanilla bean ice cream or a dollop of créme fraîche can add another layer of richness, though I find the homemade whipped cream is usually enough. You could also offer a side of extra fresh berries for those who want even more fruit.
Ultimately, this dessert is so versatile that it fits into almost any meal plan where you desire a simple, delicious, and crowd-pleasing sweet treat. Its bright flavors and easy preparation make it a stress-free addition to any gathering, allowing you to focus on the joy of the occasion.
FAQs: Your Questions About Strawberry Banana Pudding Dream Holiday No-bake Dessert Answered!
Can I make this Strawberry Banana Pudding Dream Holiday No-bake Dessert ahead of time?
Absolutely! This dessert is an excellent make-ahead option. In fact, it needs at least 4 hours to chill, but preparing it the day before you plan to serve it is ideal.
The longer chilling time allows the pudding to fully set, the flavors to meld beautifully, and the vanilla wafers to soften to that perfect cake-like consistency. This makes holiday entertaining so much easier, as you can focus on other tasks knowing your dessert is ready.
What if I don’t have vanilla wafers?
No problem at all! You can easily substitute vanilla wafers with other plain, crisp cookies. Graham crackers, shortbread cookies, or even digestive biscuits work wonderfully.
Simply arrange them in the same way you would the vanilla wafers. For a gluten free version, look for gluten-free vanilla wafers or plain gluten-free shortbread cookies.
How do I prevent the bananas from turning brown in my no-bake dessert?
Bananas naturally brown when exposed to air. To minimize this, you can lightly toss your sliced bananas in a very small amount of lemon juice (about a teaspoon for all the bananas) before layering them. This slight acidity helps slow down the oxidation process.
While the flavor might be subtly affected, it generally isn’t noticeable, especially when combined with all the other delicious flavors. Also, ensure your dish is tightly covered when chilling, which reduces air exposure.
Can I use sugar-free pudding mix and whipped topping for this recipe?
Yes, you certainly can! Using sugar-free instant vanilla pudding mix is a great way to reduce the sugar content. For the whipped cream, you can either make your own with a sugar substitute or use a sugar-free store-bought whipped topping for convenience.
These substitutions will help you create a delicious dessert that fits specific dietary preferences without sacrificing much flavor or texture. Always read the package instructions for sugar-free products, as they can sometimes have slightly different setting times or consistencies.