Oh, sweet friends, let me tell you about a little miracle that happened in my kitchen recently. As a mom of three energetic kids, finding time for myself, let alone elaborate baking, feels like a quest for the Holy Grail. But I truly believe food is love, and I want to feed my family (and myself!) nourishing, delicious meals that don’t take all day to prepare.
That’s why, when I first whipped up this incredible Vanilla Protein Cheesecake, I knew I had stumbled upon something special. It was one of those crazy Tuesday evenings homework scattered, dinner dishes piled high, and a sudden, undeniable craving for something sweet, yet wholesome. I wanted a treat that felt indulgent but wouldn’t leave me feeling sluggish.
This isn’t just any dessert; it’s a creamy, dreamy, satisfyingly sweet escape that also packs a fantastic protein punch. It tastes like a classic, velvety cheesecake, but with a secret ingredient that makes it perfect for a post-workout treat or a guilt free late night indulgence. My kids absolutely devoured it, and honestly, so did I.
We’re talking about a no-bake, simple, and utterly delicious way to enjoy a classic dessert with a healthy twist. Get ready to fall in love with your new favorite high protein vanilla cheesecake recipe!
Print
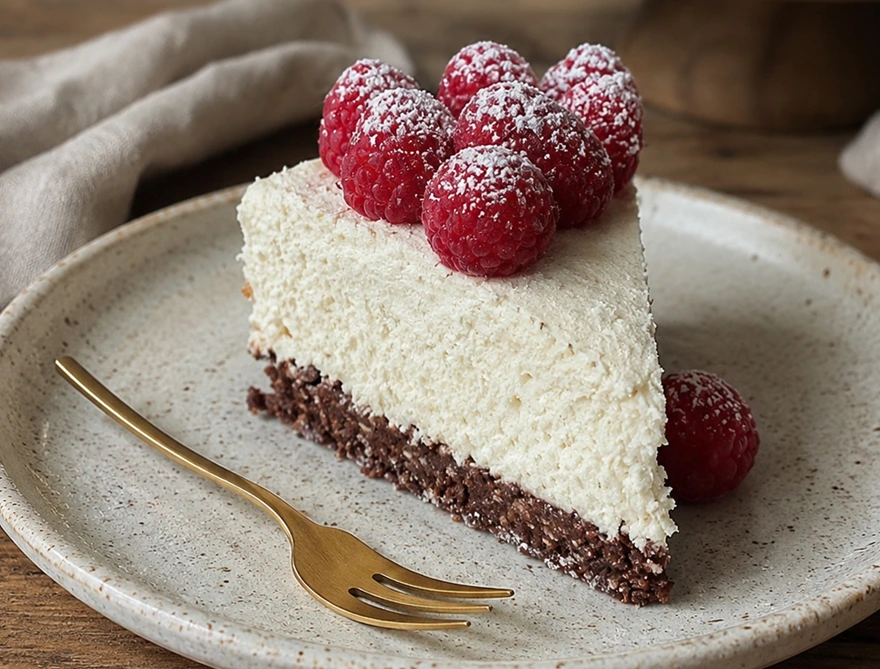
Vanilla Protein Cheesecake
This Vanilla Protein Cheesecake is a no-bake, creamy, dreamy dessert packed with protein. Perfect for a guilt-free indulgence, it’s easy to make and loved by the whole family.
- Total Time: 6 hours 20 minutes (includes chilling)
- Yield: 12 servings
Ingredients
Graham Cracker Crumbs: 1 ½ cups
Melted Butter: ¼ cup
Cream Cheese: 16 oz (2 blocks), softened
Plain Greek Yogurt: 1 cup
Vanilla Protein Powder: ½ cup
Powdered Sugar: ½ cup
Vanilla Extract: 2 teaspoons
Pinch of Salt
Instructions
1. Prepare the Crust: In a medium bowl, combine the graham cracker crumbs and melted butter. Mix thoroughly until the crumbs are evenly moistened. Press this mixture firmly into the bottom of a 9-inch springform pan. Use the back of a spoon or the bottom of a glass to create an even, compact layer. Place the pan in the refrigerator to chill while you prepare the filling.
2. Soften Cream Cheese: Ensure your cream cheese is at room temperature. This is crucial for a smooth, lump-free filling. Remove it from the fridge at least an hour before you start.
3. Make the Filling: In a large mixing bowl, add the softened cream cheese, plain Greek yogurt, vanilla protein powder, powdered sugar, vanilla extract, and a pinch of salt.
4. Mix Until Smooth: Using an electric hand mixer or a stand mixer with the paddle attachment, beat the ingredients on medium speed. Scrape down the sides of the bowl often to ensure everything incorporates evenly. Continue mixing until the mixture becomes completely smooth, creamy, and free of any lumps. Avoid overmixing, as this can incorporate too much air.
5. Assemble the Cheesecake: Retrieve your chilled crust from the refrigerator. Pour the creamy vanilla protein cheesecake filling evenly over the crust. Use an offset spatula or the back of a spoon to spread the filling smoothly across the pan, ensuring an even top.
6. Chill Thoroughly: Cover the springform pan loosely with plastic wrap. Place the cheesecake in the refrigerator and chill for a minimum of 6 hours, or ideally overnight. This chilling time is essential for the cheesecake to set properly and achieve its firm, sliceable texture. Do not rush this step!
7. Serve and Enjoy: Once thoroughly chilled and set, carefully remove the sides of the springform pan. Slice the Vanilla Protein Cheesecake into individual portions and serve.
Notes
Room Temperature Cream Cheese is Key: I cannot stress this enough! Cold cream cheese will result in a lumpy filling, no matter how long you mix it. Plan ahead and let your cream cheese sit out on the counter for at least an hour, or even two, until it’s very soft. This guarantees a silky-smooth, lump-free consistency.
Don’t Overmix the Filling: Once your ingredients are combined and smooth, stop mixing. Overmixing can incorporate too much air, which can make the cheesecake a little too light and potentially less stable when slicing. We want that dense, creamy texture!
Choose Your Protein Powder Wisely: The type of vanilla protein powder you use matters. Some powders absorb liquid differently, and some have stronger flavors. Stick with a brand you know and love, one that mixes well and doesn’t have an overpowering aftertaste. Whey protein often works beautifully for texture.
Firmly Press the Crust: A well-packed crust prevents crumbling when you slice the cheesecake. Use the bottom of a measuring cup or a flat glass to really press those graham cracker crumbs into an even, solid layer at the bottom of the springform pan.
Chill, Chill, Chill: Patience is a virtue, especially with no-bake cheesecakes. The minimum 6-hour chilling time is truly non-negotiable for a properly set cheesecake. An overnight chill is even better. This allows all the ingredients to meld and firm up, giving you that perfect slice every time.
Adjust Sweetness to Taste: Taste your filling before pouring it into the crust (since it’s a no-bake recipe, it’s safe to taste!). If you prefer it sweeter, add a bit more powdered sugar. If your protein powder is already very sweet, you might even reduce the amount of sugar.
For Easy Slicing: After chilling, run a thin, sharp knife under hot water and wipe it clean between each slice. This creates clean, beautiful cuts and prevents the filling from sticking to the blade.
Storage & Reheating Tips: Refrigerator Storage: Store the cheesecake in an airtight container or keep it in the springform pan, covered tightly with plastic wrap or aluminum foil. It will stay fresh in the refrigerator for up to 5-7 days.
Freezer Storage: This cheesecake freezes beautifully! For best results, chill the cheesecake until firm, then remove it from the springform pan. You can freeze the entire cheesecake or individual slices. Wrap the cheesecake tightly in several layers of plastic wrap, then an additional layer of aluminum foil to prevent freezer burn. It will keep in the freezer for up to 1-2 months.
Thawing: To thaw, simply transfer the frozen cheesecake (or individual slices) to the refrigerator and let it thaw slowly overnight.
- Prep Time: 20 minutes
- Cook Time: 0 minutes
- Category: Dessert
- Method: No-bake
- Cuisine: American
- Diet: Vegetarian
Nutrition
- Serving Size: 1 slice
- Calories: 280
- Sugar: 15g
- Sodium: 280mg
- Fat: 18g
- Saturated Fat: 10g
- Unsaturated Fat: 6g
- Trans Fat: 0g
- Carbohydrates: 22g
- Fiber: 1g
- Protein: 14g
- Cholesterol: 55mg
Why You’ll Love This Vanilla Protein Cheesecake Recipe
You need this Vanilla Protein Cheesecake in your life, plain and simple. First and foremost, it’s unbelievably delicious. Seriously, it has all the luscious, creamy texture and sweet vanilla flavor you expect from a classic cheesecake, but without the heavy feeling. We prioritize taste in this house, and this recipe delivers it in spades.
Next, it’s packed with protein. As a mom, I’m always looking for creative ways to sneak in extra protein for growing bodies (and my own!). This cheesecake uses a good quality protein powder, transforming a dessert into a truly satisfying snack or post dinner treat. You feel full and energized, not weighed down.
Furthermore, this is a no-bake recipe. Hallelujah! No turning on the oven, no water baths, no cracked tops to worry about.
You simply mix, chill, and enjoy. This makes it perfect for busy weeknights, warm summer days, or when you just don’t want to fuss with complicated baking steps. It’s truly a simple, nourishing recipe.
It’s also incredibly versatile. You can easily adjust the sweetness or add your favorite toppings, making it a truly customizable dessert. Plus, it’s a crowd-pleaser!
Everyone in my family, from the pickiest eater to the most discerning dessert connoisseur, asks for this cheesecake again and again. It feels like a fancy dessert but requires minimal effort. This cheesecake truly embodies my belief that food is love, made easy and nourishing.
Ingredients You’ll Need
Gathering your ingredients for this easy Vanilla Protein Cheesecake is a breeze. You likely have most of these staples already in your pantry or fridge. I always make sure to use high-quality ingredients for the best flavor and nutritional benefits.
| Ingredient | Quantity | Notes |
|---|---|---|
| Graham Cracker Crumbs | 1 ½ cups | Or crush your own graham crackers. |
| Melted Butter | ¼ cup | Unsalted works best. |
| Cream Cheese | 16 oz (2 blocks) | Full-fat, softened at room temperature for best results. |
| Plain Greek Yogurt | 1 cup | Full-fat, for extra creaminess and protein. |
| Vanilla Protein Powder | ½ cup | Your favorite brand, whey or plant-based. |
| Powdered Sugar | ½ cup | Or your preferred granular sweetener. Adjust to taste. |
| Vanilla Extract | 2 teaspoons | Good quality vanilla makes a huge difference. |
| Pinch of Salt | Enhances all the flavors. |
[image 2]
Substitutions & Variations
This Vanilla Protein Cheesecake is already fantastic, but you can certainly customize it to fit your dietary needs or flavor preferences. Here are some simple and nourishing ideas:
- For the Crust: No graham crackers? No problem! Use crushed digestive biscuits, vanilla wafers, or even a mix of nuts and dates for a gluten-free, no-bake crust. For a truly low-carb option, blend almond flour with a little melted butter and sweetener.
- Dairy-Free Option: Swap the cream cheese for a plant-based, dairy-free cream cheese alternative. Use an unsweetened plain dairy-free yogurt (like coconut or almond-based) instead of Greek yogurt. Ensure your protein powder is also dairy-free.
- Protein Powder: I recommend vanilla protein powder for this recipe, but you can experiment! Chocolate protein powder would create a delicious chocolate protein cheesecake. A neutral or unflavored protein powder works too, just increase the vanilla extract slightly. You can use whey protein, casein, or a plant-based protein powder – just be aware that some plant-based powders might alter the texture slightly.
- Sweetener Alternatives: Instead of powdered sugar, you can use maple syrup, honey, or a sugar-free granular sweetener like erythritol or stevia blend. Adjust the quantity to your taste preferences. If using liquid sweeteners, you might need to slightly reduce the amount of yogurt to maintain consistency.
- Flavor Boosts:
- Lemon Zest: Add 1-2 teaspoons of fresh lemon zest to the filling for a bright, zesty vanilla lemon protein cheesecake.
- Chocolate Swirl: Melt a few tablespoons of chocolate chips with a touch of coconut oil and swirl it into the cheesecake batter before chilling.
- Coffee Kick: Mix in a teaspoon of instant espresso powder for a mocha vanilla twist.
- Nut Butter: Swirl in some peanut butter or almond butter for a nutty flavor.
- Toppings Galore: Fresh berries (strawberries, blueberries, raspberries) are always a winner. A drizzle of chocolate sauce, a dollop of whipped cream (dairy or non-dairy), or even a sprinkle of chopped nuts elevate this dessert even further.
Step-by-Step Instructions
Making this Vanilla Protein Cheesecake is incredibly straightforward. Just follow these simple steps, and you’ll have a delightful dessert chilling in no time!
- Prepare the Crust: In a medium bowl, combine the graham cracker crumbs and melted butter. Mix thoroughly until the crumbs are evenly moistened. Press this mixture firmly into the bottom of a 9-inch springform pan. Use the back of a spoon or the bottom of a glass to create an even, compact layer. Place the pan in the refrigerator to chill while you prepare the filling.
- Soften Cream Cheese: Ensure your cream cheese is at room temperature. This is crucial for a smooth, lump-free filling. Remove it from the fridge at least an hour before you start.
- Make the Filling: In a large mixing bowl, add the softened cream cheese, plain Greek yogurt, vanilla protein powder, powdered sugar, vanilla extract, and a pinch of salt.
- Mix Until Smooth: Using an electric hand mixer or a stand mixer with the paddle attachment, beat the ingredients on medium speed. Scrape down the sides of the bowl often to ensure everything incorporates evenly. Continue mixing until the mixture becomes completely smooth, creamy, and free of any lumps. Avoid overmixing, as this can incorporate too much air.
- Assemble the Cheesecake: Retrieve your chilled crust from the refrigerator. Pour the creamy vanilla protein cheesecake filling evenly over the crust. Use an offset spatula or the back of a spoon to spread the filling smoothly across the pan, ensuring an even top.
- Chill Thoroughly: Cover the springform pan loosely with plastic wrap. Place the cheesecake in the refrigerator and chill for a minimum of 6 hours, or ideally overnight. This chilling time is essential for the cheesecake to set properly and achieve its firm, sliceable texture. Do not rush this step!
- Serve and Enjoy: Once thoroughly chilled and set, carefully remove the sides of the springform pan. Slice the Vanilla Protein Cheesecake into individual portions and serve.
[image 3]
Pro Tips for Success
Achieving a perfect Vanilla Protein Cheesecake is easy with a few simple tricks up your sleeve. These pro tips will ensure your cheesecake turns out wonderfully every time:
- Room Temperature Cream Cheese is Key: I cannot stress this enough! Cold cream cheese will result in a lumpy filling, no matter how long you mix it. Plan ahead and let your cream cheese sit out on the counter for at least an hour, or even two, until it’s very soft. This guarantees a silky-smooth, lump-free consistency.
- Don’t Overmix the Filling: Once your ingredients are combined and smooth, stop mixing. Overmixing can incorporate too much air, which can make the cheesecake a little too light and potentially less stable when slicing. We want that dense, creamy texture!
- Choose Your Protein Powder Wisely: The type of vanilla protein powder you use matters. Some powders absorb liquid differently, and some have stronger flavors. Stick with a brand you know and love, one that mixes well and doesn’t have an overpowering aftertaste. Whey protein often works beautifully for texture.
- Firmly Press the Crust: A well-packed crust prevents crumbling when you slice the cheesecake. Use the bottom of a measuring cup or a flat glass to really press those graham cracker crumbs into an even, solid layer at the bottom of the springform pan.
- Chill, Chill, Chill: Patience is a virtue, especially with no-bake cheesecakes. The minimum 6-hour chilling time is truly non-negotiable for a properly set cheesecake. An overnight chill is even better. This allows all the ingredients to meld and firm up, giving you that perfect slice every time.
- Adjust Sweetness to Taste: Taste your filling before pouring it into the crust (since it’s a no-bake recipe, it’s safe to taste!). If you prefer it sweeter, add a bit more powdered sugar. If your protein powder is already very sweet, you might even reduce the amount of sugar.
- For Easy Slicing: After chilling, run a thin, sharp knife under hot water and wipe it clean between each slice. This creates clean, beautiful cuts and prevents the filling from sticking to the blade.
Storage & Reheating Tips
Once you’ve made your delicious Vanilla Protein Cheesecake, you’ll want to store it properly to keep it fresh and tasty. This is a dessert that truly shines when chilled!
- Refrigerator Storage: Store the cheesecake in an airtight container or keep it in the springform pan, covered tightly with plastic wrap or aluminum foil. It will stay fresh in the refrigerator for up to 5-7 days. The flavors actually deepen a bit after a day or two!
- Freezer Storage: This cheesecake freezes beautifully! For best results, chill the cheesecake until firm, then remove it from the springform pan. You can freeze the entire cheesecake or individual slices. Wrap the cheesecake tightly in several layers of plastic wrap, then an additional layer of aluminum foil to prevent freezer burn. It will keep in the freezer for up to 1-2 months.
- Thawing Frozen Cheesecake: To thaw, simply transfer the frozen cheesecake (or individual slices) to the refrigerator and let it thaw slowly overnight. Avoid thawing at room temperature, as this can affect the texture.
- Serving Temperature: Always serve this cheesecake chilled. Its creamy texture and refreshing taste are best enjoyed straight from the refrigerator. Reheating is not recommended, as it will alter the beloved texture and consistency.
What to Serve With This Recipe
This Vanilla Protein Cheesecake is a star on its own, but pairing it with a few simple additions can elevate the experience even further. Since it’s a nourishing treat, I like to keep the accompaniments light and fresh:
- Fresh Berries: A vibrant mix of fresh strawberries, blueberries, raspberries, or sliced peaches adds a beautiful pop of color and natural sweetness. The slight tartness of the fruit complements the creamy vanilla perfectly.
- A Light Sauce: A drizzle of homemade berry compote (just simmer berries with a touch of sugar or maple syrup), a light chocolate sauce, or even a simple caramel sauce can add an extra layer of flavor.
- Whipped Cream or Coconut Cream: A dollop of freshly whipped cream (dairy or non-dairy for a lighter option) makes it feel extra decadent.
- A Warm Beverage: Enjoy a slice with a comforting cup of coffee, your favorite herbal tea, or even a glass of milk. It’s the perfect end to any meal, whether it’s a hearty dinner like Smash Burger Tacos or a simpler Hot Honey Chicken Bowls.
- On its Own: Honestly, this creamy, satisfying cheesecake needs no embellishment. It’s absolutely delicious all by itself, especially when you’re looking for a quick, protein-packed dessert after enjoying a healthy meal like high protein pasta salad.
FAQs About Vanilla Protein Cheesecake
I often get asked various questions about healthy desserts, and this Vanilla Protein Cheesecake is no exception. Here are some common inquiries:
Can I make this Vanilla Protein Cheesecake ahead of time?
Absolutely, yes! This cheesecake is perfect for making ahead. In fact, it tastes even better after a full overnight chill, as the flavors have more time to meld and the texture becomes perfectly firm. You can easily prepare it a day or two before you plan to serve it.
What kind of vanilla protein powder works best for this recipe?
I recommend using a good quality vanilla whey protein powder or a blend that you enjoy the taste of. Casein protein powder also works well for creating a creamy texture. If you use a plant-based protein powder, be aware that the texture might be slightly different, and you might need to adjust the amount of liquid a tiny bit. Choose a protein powder that dissolves well and doesn’t have a strong artificial aftertaste.
Is this a truly healthy cheesecake?
While it’s still a dessert, this Vanilla Protein Cheesecake offers a significantly healthier profile than traditional cheesecake. It’s packed with protein from the protein powder and Greek yogurt, helping you feel fuller and more satisfied. We use natural sweeteners, and you can easily control the sugar content. It’s a smart choice when you crave something sweet but still want to nourish your body.
Can I skip the crust or use a different type of crust?
Yes, you can absolutely skip the crust for a gluten-free and lower-carb option. Simply pour the filling into individual ramekins or a lined pan and chill. For an alternative, a nut-based crust made from ground almonds or pecans with a touch of butter and sweetener also works wonderfully and adds healthy fats.
How long does it take to make this no-bake vanilla protein cheesecake?
The active preparation time for this cheesecake is remarkably quick, usually around 15-20 minutes. The longest part is the chilling time, which requires a minimum of 6 hours, or ideally overnight, for the cheesecake to properly set. This means you need to plan ahead, but the hands-on effort is minimal.