Oh, my sweet friends! As a mom of three, I know firsthand the daily dance of getting a delicious, nourishing meal on the table that everyone will actually eat. There are days when I feel like a culinary magician, pulling off a feast, and then there are the Tuesdays.
You know, the Tuesdays. The ones where soccer practice runs late, homework is a battle, and all you want is something quick, satisfying, and utterly delightful. That’s precisely when my beloved Crispy Chicken Caesar Wrap steps onto the stage. It’s more than just a recipe; it’s a lifesaver, a weeknight hero, and frankly, a hug in a tortilla.
I remember the first time I whipped up this Caesar wrap. My youngest, Leo, who usually eyes anything green with suspicion, took a bite, his eyes widened, and he declared, “Mom, this is like a salad but…fun!” Success!
That moment solidified its place in our family meal rotation. We’re talking tender, juicy chicken, perfectly seasoned and cooked to a glorious crisp, nestled with crisp romaine lettuce, savory Parmesan cheese, and a creamy Caesar dressing, all tucked into a warm tortilla. The texture contrast, the explosion of flavor it’s simply irresistible.
This isn’t just a basic chicken Caesar wrap; it’s *the* Crispy Chicken Caesar Wrap, elevated to a simple, homemade perfection that will have everyone asking for seconds. It’s truly a testament to my philosophy that food is love, especially when it’s simple and nourishing for my busy family.
Print
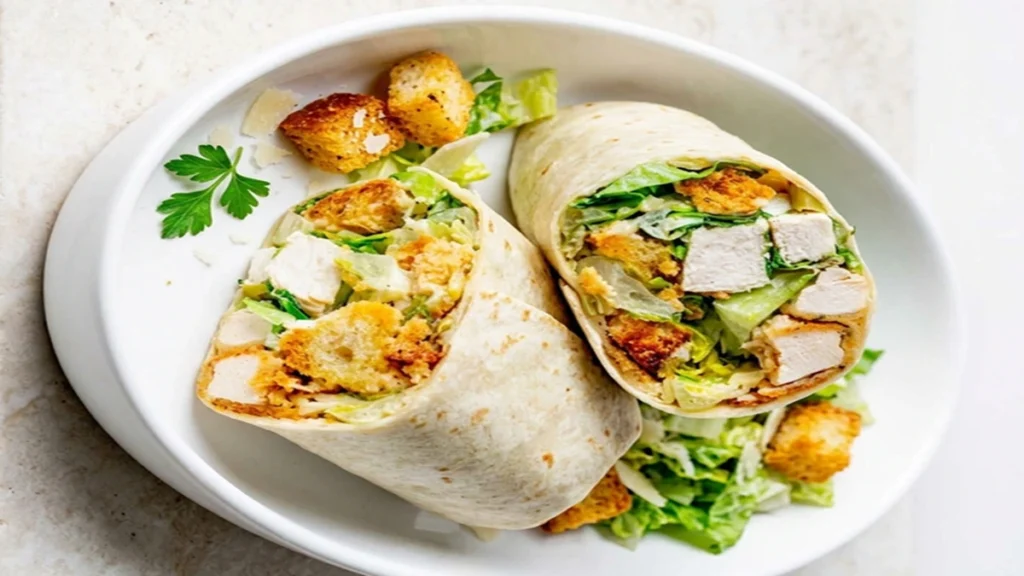
Crispy Chicken Caesar Wrap
This Crispy Chicken Caesar Wrap is a weeknight hero, featuring tender, juicy chicken with a glorious crisp, nestled with crisp romaine, savory Parmesan, and creamy Caesar dressing in a warm tortilla. It’s a simple, family-friendly meal that delivers on taste and texture.
- Total Time: 35 minutes
- Yield: 4–6 wraps 1x
Ingredients
For the Crispy Chicken: 1.5 lbs boneless skinless chicken breasts (about 3 medium)
2 tablespoons olive oil
1 teaspoon garlic powder
1 teaspoon paprika
½ teaspoon salt
¼ teaspoon black pepper
For the Caesar Dressing (Homemade): ½ cup mayonnaise (full-fat recommended)
¼ cup grated Parmesan cheese
2 tablespoons fresh lemon juice
1 teaspoon Dijon mustard
1 teaspoon Worcestershire sauce
1 clove garlic, minced
Salt and pepper to taste
For Assembling the Wrap: 4-6 large flour tortillas (10-inch)
4–6 cups chopped romaine lettuce
½ cup shaved or grated Parmesan cheese
Instructions
1. Prepare the Chicken: Pat chicken breasts dry with paper towels. Slice each horizontally to create ½-inch thick cutlets. In a shallow dish, combine olive oil, garlic powder, paprika, salt, and pepper. Toss chicken cutlets in the mixture to coat thoroughly.
2. Cook the Crispy Chicken: Heat a large non-stick skillet over medium-high heat. Place chicken in a single layer (cook in batches if needed). Sear for 4-6 minutes per side until golden brown and cooked through (internal temperature 165°F/74°C). Remove and let rest on a cutting board for 5 minutes; then slice or chop into bite-sized pieces.
3. Prepare the Caesar Dressing: In a small bowl, whisk together mayonnaise, grated Parmesan, lemon juice, Dijon mustard, Worcestershire sauce, and minced garlic. Season with salt and pepper to taste.
4. Assemble the Wraps: Lay a tortilla flat. Spread about 2 tablespoons of dressing down the center. Layer with a handful of romaine, a portion of crispy chicken, and a sprinkle of shaved Parmesan. Fold in the sides, then roll tightly from the bottom. Cut in half diagonally and serve immediately.
Notes
For best results, pat chicken very dry before seasoning to ensure crispiness. Don’t overcrowd the pan; cook in batches if needed. Let chicken rest before slicing for juiciness. Warm tortillas briefly to prevent cracking. Store components separately for meal prep: cooked chicken (3-4 days in fridge), dressing (5-7 days), and lettuce (up to 5 days). Reheat chicken in skillet or air fryer to regain crispiness.
- Prep Time: 15 minutes
- Cook Time: 20 minutes
- Category: Main Course
- Method: Pan-searing
- Cuisine: American
- Diet: none specified
Nutrition
- Serving Size: 1 wrap
- Calories: 550
- Sugar: 3g
- Sodium: 900mg
- Fat: 28g
- Saturated Fat: 7g
- Unsaturated Fat: 18g
- Trans Fat: 0g
- Carbohydrates: 35g
- Fiber: 3g
- Protein: 38g
- Cholesterol: 95mg
Why You’ll Love This Crispy Chicken Caesar Wrap Recipe
This Crispy Chicken Caesar Wrap isn’t just another item on your meal plan; it’s a game changer. First, it’s incredibly simple. You do not need a culinary degree to create something truly delicious here.
We are talking about straightforward steps and readily available ingredients. Second, the flavor profile is out of this world. The combination of crispy chicken, fresh romaine, pungent Parmesan, and a zingy Caesar dressing creates a symphony in every bite. It’s fresh, it’s savory, and it’s deeply satisfying.
Furthermore, this recipe is a masterclass in texture. That crunch from the chicken, the crispness of the lettuce, and the softness of the tortilla all work in harmony. It offers a wonderful contrast that keeps every mouthful exciting.
For busy parents like me, it’s also wonderfully customizable. You can adapt it to fit picky eaters or dietary needs without sacrificing flavor. It’s a full meal packed into one convenient package, perfect for quick dinners, packed lunches, or even a picnic in the park. This wrap delivers on taste, ease, and family-friendly appeal, making it an instant favorite.
Ingredients You’ll Need
Gathering your ingredients is the first step to culinary success. This Crispy Chicken Caesar Wrap relies on fresh, quality components to truly shine. Here’s what you will need to create this family favorite:
| Component | Ingredient | Quantity |
|---|---|---|
| For the Crispy Chicken | Boneless, skinless chicken breasts | 1.5 lbs (about 3 medium breasts) |
| Olive oil | 2 tablespoons | |
| Garlic powder | 1 teaspoon | |
| Paprika | 1 teaspoon | |
| Salt | ½ teaspoon | |
| Black pepper | ¼ teaspoon | |
| For the Caesar Dressing (Homemade) | Mayonnaise (full-fat recommended) | ½ cup |
| Parmesan cheese, grated | ¼ cup | |
| Lemon juice, fresh | 2 tablespoons | |
| Dijon mustard | 1 teaspoon | |
| Worcestershire sauce | 1 teaspoon | |
| Garlic, minced | 1 clove | |
| Salt and pepper | To taste | |
| For Assembling the Wrap | Large flour tortillas (10-inch) | 4-6 |
| Romaine lettuce, chopped | 4-6 cups | |
| Parmesan cheese, shaved or grated | ½ cup |
(Note: You can always use your favorite store-bought Caesar dressing to save time, but I promise, the homemade version takes this wrap to another level!)

Substitutions & Variations
One of the beauties of this Crispy Chicken Caesar Wrap is its adaptability. Feel free to get creative and tailor it to your family’s tastes or dietary needs. It makes mealtime fun and flexible!
- Chicken Alternatives: If you prefer, swap chicken breasts for boneless, skinless chicken thighs for even juicier results. You could also use rotisserie chicken for a super speedy meal; just shred it and toss with a little extra seasoning before adding to the wrap. For a plant-based option, crispy baked tofu or chickpeas work wonderfully in place of chicken.
- Tortilla Choices: Regular flour tortillas are classic, but feel free to experiment. Whole wheat tortillas add extra fiber, spinach wraps sneak in a little green, and gluten-free tortillas make this recipe accessible for everyone. You could even use large lettuce cups for a low-carb version.
- Dressing Customization: While my homemade Caesar dressing is a winner, store bought options are perfectly fine for busy nights. For a dairy free dressing, use a vegan mayonnaise base and nutritional yeast in place of Parmesan. Add a pinch of red pepper flakes to the dressing for a subtle kick.
- Veggie Boost: Load up your wraps with extra veggies! Thinly sliced red onion, cucumber, cherry tomatoes, or even a handful of spinach would be delicious additions.
- Cheese Swaps: Not a fan of Parmesan? Try a mild provolone, a sharp cheddar, or even a sprinkle of feta for a different flavor profile.
- Spice it Up: For those who love a bit of heat, consider adding a dash of cayenne pepper to the chicken seasoning or a drizzle of hot sauce to your finished wrap. My family loves a touch of heat, so sometimes I add a touch of hot honey chicken flavor profile, much like in my Hot Honey Chicken Bowls.
- Make it a Bowl: If you want to skip the wrap entirely, serve all the components in a bowl for a delicious and satisfying salad!
Step-by-Step Instructions
Let’s get cooking! Making this Crispy Chicken Caesar Wrap is a straightforward process, and I’ve broken it down into simple steps to ensure your success. Remember, cooking with love makes everything taste better!
- Prepare the Chicken:
- Pat the chicken breasts very dry with paper towels. This step is crucial for achieving crispy chicken.
- Slice each chicken breast horizontally to create thinner cutlets, about ½ inch thick. This ensures even cooking and more surface area for crispiness.
- In a shallow dish or on a plate, combine the olive oil, garlic powder, paprika, salt, and black pepper.
- Toss the chicken cutlets in the seasoning mixture, making sure each piece is thoroughly coated.
- Cook the Crispy Chicken:
- Heat a large non-stick skillet over medium-high heat.
- Once hot, add the seasoned chicken in a single layer, ensuring not to overcrowd the pan. Cook in batches if necessary.
- Sear the chicken for 4-6 minutes per side, until golden brown, crispy, and cooked through (internal temperature should reach 165°F/74°C).
- Remove the chicken from the skillet and let it rest on a cutting board for 5 minutes. Then, slice or chop the crispy chicken into bite-sized pieces.
- Prepare the Caesar Dressing (if homemade):
- While the chicken cooks, whisk together the mayonnaise, grated Parmesan cheese, fresh lemon juice, Dijon mustard, Worcestershire sauce, and minced garlic in a small bowl.
- Season the dressing with salt and pepper to taste. Adjust lemon juice or Parmesan as desired.
- Assemble the Wraps:
- Lay a large flour tortilla flat on a clean surface.
- Spread a generous spoonful (about 2 tablespoons) of Caesar dressing down the center of the tortilla, leaving space around the edges.
- Layer a handful of chopped romaine lettuce over the dressing.
- Spoon a good portion of the crispy chicken pieces onto the lettuce.
- Sprinkle with extra shaved or grated Parmesan cheese.
- Fold and Serve:
- Fold in the sides of the tortilla over the filling, then tightly roll it up from the bottom, creating a secure wrap.
- Cut the wrap in half diagonally for easy handling and presentation.
- Serve immediately and enjoy your delicious Crispy Chicken Caesar Wrap!
Pro Tips for Success
Achieving the perfect Crispy Chicken Caesar Wrap is all about paying attention to a few key details. These simple tips will elevate your wraps from good to absolutely amazing, just like the kind of thoughtful cooking that makes a meal truly special for your family.
- Dry Chicken is Key: Always, always pat your chicken breasts thoroughly dry with paper towels before seasoning. Excess moisture prevents the chicken from browning and getting that desired crispiness. This is perhaps the most important tip for truly crispy chicken.
- Don’t Overcrowd the Pan: When cooking the chicken, ensure there’s enough space between each piece in the skillet. If you overcrowd the pan, the chicken will steam instead of sear, resulting in a less crispy texture. Cook in batches if necessary.
- Rest Your Chicken: After cooking, let the chicken rest for 5-10 minutes before slicing. This allows the juices to redistribute, ensuring incredibly tender and moist chicken, even with that crispy exterior.
- Warm Your Tortillas: Briefly warming your tortillas before assembling makes them more pliable and less likely to crack when rolled. You can do this in a dry skillet for 15-20 seconds per side, in the microwave for 10-15 seconds, or even quickly over an open flame (carefully!).
- Make Dressing Ahead: If using homemade Caesar dressing, prepare it a few hours or even a day in advance. This allows the flavors to meld beautifully, resulting in a richer, more complex taste.
- Chop Lettuce Fine: Finely chop your romaine lettuce. Smaller pieces distribute better throughout the wrap, ensuring you get some in every bite, and it makes the wrap easier to eat without big chunks falling out.
- Don’t Overfill: It’s tempting to stuff your wraps, but an overfilled tortilla is difficult to roll and messy to eat. Find that sweet spot where it’s generous but manageable.
- Serve Immediately: While components can be prepped, assembled wraps are best enjoyed right after making them. The dressing can make the tortilla soggy and the lettuce wilt if left sitting too long.
Storage & Reheating Tips
While this Crispy Chicken Caesar Wrap is definitely best enjoyed fresh, I understand that sometimes life happens, and we need to plan ahead or save leftovers. Here’s how to manage storage and reheating to maintain as much quality as possible, because nobody likes a soggy wrap!
- Storing Components Separately: This is my number one tip for delicious leftovers! Store the cooked crispy chicken, chopped romaine, and Caesar dressing in separate airtight containers in the refrigerator.
- Crispy Chicken: Store in an airtight container for up to 3-4 days.
- Caesar Dressing: Homemade dressing lasts about 5-7 days in an airtight container in the fridge.
- Romaine Lettuce: Wash, dry thoroughly, and store in an airtight container lined with a paper towel for up to 5 days.
- Assembled Wraps: If you must store an assembled wrap, wrap it tightly in plastic wrap or aluminum foil and refrigerate for no more than 1-2 days. Be aware that the lettuce might wilt, and the tortilla might become slightly soft from the dressing. It won’t be as crispy as fresh, but it will still be tasty.
- Reheating Crispy Chicken:
- For Crispiest Results: Reheat the chicken in a dry skillet over medium heat for a few minutes per side until warmed through and crispy again.
- Oven/Air Fryer: You can also reheat the chicken in a preheated oven at 375°F (190°C) or an air fryer at 350°F (175°C) for 5-8 minutes, until heated through and crisp.
- Microwave: While convenient, the microwave will make the chicken less crispy. Use it only if you prioritize speed over texture.
- Reassembling: When ready to eat, simply warm your tortilla (if desired), then assemble a fresh wrap with the reheated chicken, fresh lettuce, and dressing. This ensures the best possible texture and taste.
What to Serve With This Recipe
A well-rounded meal makes everyone happy! While the Crispy Chicken Caesar Wrap is a complete meal on its own, adding a simple side or two can elevate the experience and add extra nourishment. Here are some of my family’s favorite companions:
- Fresh Fruit Salad: A bowl of colorful, seasonal fruit provides a refreshing contrast to the savory wrap. Think berries, melon, grapes, or orange slices.
- Simple Green Salad: If you want more greens, a light side salad with a vinaigrette dressing complements the richness of the Caesar wrap beautifully.
- Vegetable Sticks with Dip: Crunchy carrots, celery, bell peppers, or cucumber sticks with a creamy hummus or ranch dip are always a hit, especially with the kids.
- Soup: A light, pureed vegetable soup, like tomato basil or a creamy broccoli cheddar, can be a comforting addition, especially on a cooler evening.
- Crispy Oven Fries or Sweet Potato Fries: For a more indulgent side, a batch of homemade baked fries or sweet potato fries makes for a classic pairing.
- Chips and Salsa: Keep it casual with a bowl of your favorite tortilla chips and a fresh salsa or guacamole.
- Pasta Salad: A cold pasta salad can be a fantastic, substantial side. My High-Protein Pasta Salad would be an excellent choice, offering extra protein and vibrant veggies.
Remember, the goal is simple and nourishing, so pick what works best for your family and your busy schedule! If you’re looking for other easy, family-friendly recipes to fill your week, be sure to check out some of my other favorites like Smash Burger Tacos for a fun dinner or Peanut Butter Overnight Oats for a quick breakfast prep!
FAQs About Crispy Chicken Caesar Wraps
Can I make the chicken ahead of time for my Crispy Chicken Caesar Wrap?
Absolutely! You can cook the chicken up to 3-4 days in advance. Store it in an airtight container in the refrigerator. When you are ready to assemble your wrap, simply reheat the chicken using one of my suggested methods (skillet, oven, or air fryer) to regain its crispiness.
What kind of tortillas work best for these Caesar wraps?
Large flour tortillas, typically 10 inch or “burrito size,” work best. Their size and pliability make them ideal for holding a good amount of filling without tearing. Whole wheat or gluten-free tortillas are also great options if you prefer.
How do I make the chicken extra crispy without frying?
The key to extra crispy chicken without deep frying lies in a few steps: pat the chicken thoroughly dry before seasoning, use a hot skillet (medium-high heat), do not overcrowd the pan (cook in batches if needed), and ensure you cook for enough time on each side to develop a golden, crispy crust. A touch of paprika in the seasoning can also aid in browning.
Can I use store-bought Caesar dressing instead of making it homemade?
Yes, absolutely! While my homemade Caesar dressing recipe is fantastic, using a good quality store bought Caesar dressing is a perfectly acceptable time-saver. Choose your favorite brand to keep meal prep simple and efficient, especially on those extra busy weeknights.
Is this Crispy Chicken Caesar Wrap suitable for meal prep?
Yes, it is! For best results in meal prep, store the components separately. Cooked crispy chicken, chopped romaine, and Caesar dressing should all be kept in individual airtight containers in the refrigerator.
When you are ready to eat, simply reheat the chicken, warm a tortilla if desired, and assemble your fresh wrap. This method prevents sogginess and maintains optimal texture.
Can I add other vegetables to my Caesar wrap?
Definitely! This wrap is very versatile. Consider adding thinly sliced red onion for a bite, some diced cucumber for extra crunch, cherry tomatoes for a burst of freshness, or even a handful of baby spinach for added greens. Customize it with your family’s favorite vegetables to make it even more nourishing and delicious.