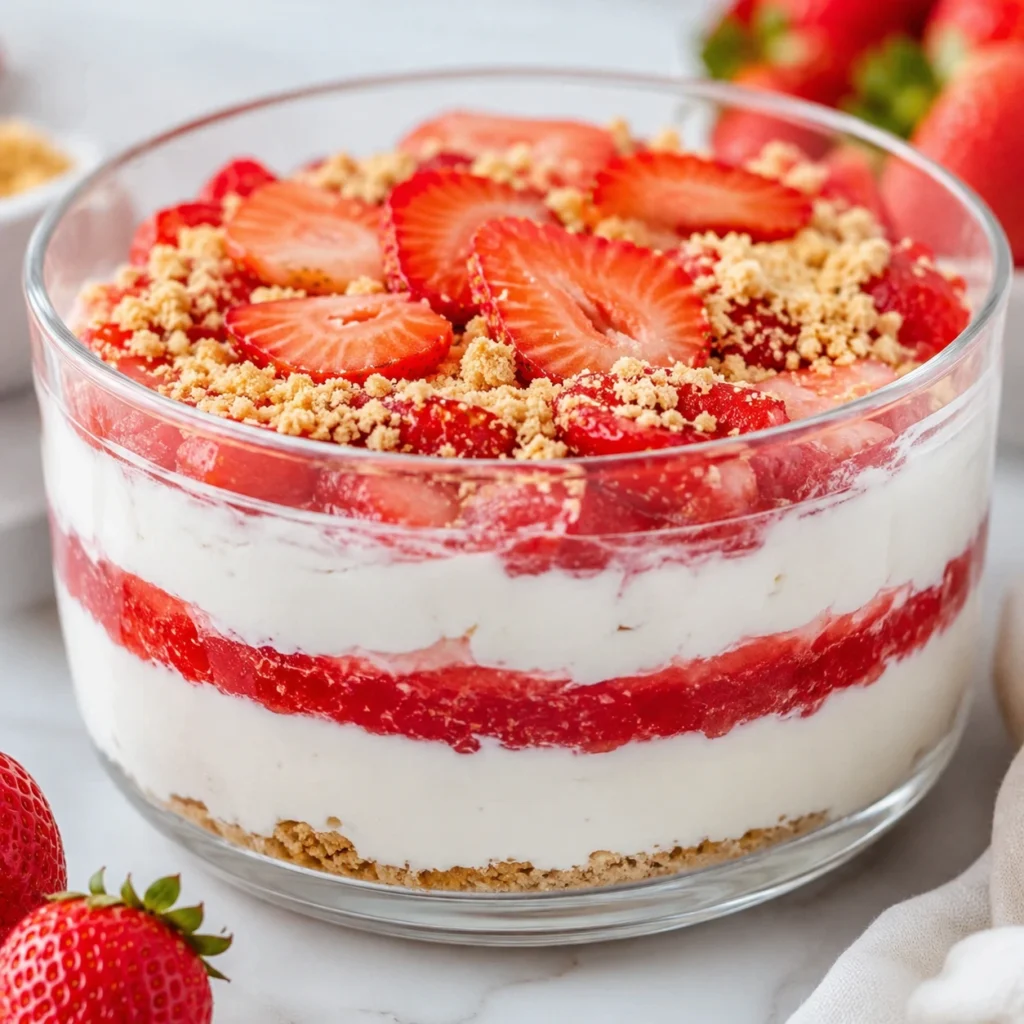
Oh, the endless quest for a dessert that everyone loves, but that doesn’t leave you feeling guilty or stuck in the kitchen for hours! As a mom of three, I live by the motto that food is love, but it also needs to be simple and nourishing. I remember one scorching summer afternoon, the kids were begging for something sweet, and honestly, the thought of turning on the oven made me want to melt away myself.
My kitchen was already a sauna, and my energy levels were at an all time low after a morning of playground adventures. I needed a miracle dessert that was cool, creamy, and packed a little extra goodness to keep my busy bees fueled.
That day, inspiration struck! I thought, “What if I could combine the lusciousness of cheesecake with the goodness of protein, and make it absolutely no-bake?” The idea sparked a flurry of mixing and chilling, and the result was pure magic. This No-Bake Strawberry Protein Cheesecake quickly became a staple in our home.
It’s truly a game changer a creamy, dreamy, vibrant strawberry sensation that comes together without a single flicker of oven heat. This healthy no bake strawberry cheesecake is not just a dessert; it’s a solution for busy parents, a protein-packed treat for growing kids, and a delightful indulgence for anyone craving something sweet and satisfying without the fuss.
It’s the kind of recipe that makes you feel like a kitchen wizard, even on your most exhausted days. I’m so excited for you to try it!
Print
No-Bake Strawberry Protein Cheesecake
A creamy, dreamy, no-bake strawberry protein cheesecake that is healthy, simple to make, and perfect for busy families. It combines the lusciousness of cheesecake with a protein boost from Greek yogurt and protein powder, all without turning on the oven.
- Total Time: 4 hours 20 minutes (includes chilling time)
- Yield: 10 servings 1x
Ingredients
For the Crust: 1 ½ cups (about 12 full sheets) graham crackers, crushed
½ cup almond flour
¼ cup melted coconut oil
2 tablespoons maple syrup
For the Filling: 16 oz (2 blocks) cream cheese (light or full-fat), softened
1 cup (240g) plain Greek yogurt (full-fat recommended)
½ cup (about 2 scoops) vanilla protein powder
2 cups fresh or frozen strawberries, hulled and sliced
¼ cup maple syrup
1 tablespoon lemon juice
1 teaspoon vanilla extract
For Garnish (Optional): Fresh strawberries, sliced, as desired
Instructions
1. Step 1: Lightly grease a 9-inch springform pan with coconut oil or baking spray. Line the bottom with parchment paper.
2. Step 2: In a food processor, pulse graham crackers until finely ground. In a medium bowl, combine the graham cracker crumbs, almond flour, melted coconut oil, and maple syrup. Mix until the mixture resembles wet sand. Press firmly into the bottom of the prepared pan. Refrigerate while making the filling.
3. Step 3: In a blender or food processor, combine strawberries and lemon juice. Blend until smooth. For an extra smooth filling, strain through a fine-mesh sieve to remove seeds. Set aside.
4. Step 4: In a large bowl, beat softened cream cheese with an electric mixer until smooth and creamy. Add Greek yogurt, maple syrup, and vanilla extract, beating until combined. Gently mix in the protein powder on low speed until just combined. Fold in the strawberry puree until the filling is uniformly pink. Taste and adjust sweetness if needed.
5. Step 5: Pour the filling over the chilled crust, spreading evenly. Cover loosely with plastic wrap and refrigerate for at least 4-6 hours, preferably overnight, until firm.
6. Step 6: To serve, run a thin knife around the edge of the pan, then release the springform sides. Slice with a warm knife (run under hot water and wipe clean between cuts). Garnish with fresh strawberry slices if desired.
Notes
Ensure cream cheese and yogurt are at room temperature for a smooth filling. Do not overmix after adding protein powder. For clean slices, chill overnight. Store covered in the refrigerator for up to 4-5 days. Freeze individual slices for up to 2 months. See article for extensive substitutions and variations.
- Prep Time: 20 minutes
- Cook Time: 0 minutes
- Category: Dessert
- Method: No-Bake
- Cuisine: American
- Diet: High-Protein, Gluten-Free optional, Dairy-Free optional, Sugar-Free optional
Nutrition
- Serving Size: 1 slice
- Calories: 290
- Sugar: 16g
- Sodium: 280mg
- Fat: 16g
- Saturated Fat: 9g
- Unsaturated Fat: 5g
- Trans Fat: 0g
- Carbohydrates: 23g
- Fiber: 2g
- Protein: 14g
- Cholesterol: 50mg
Why You’ll Love This No-Bake Strawberry Protein Cheesecake Recipe
You need this delightful No-Bake Strawberry Protein Cheesecake in your life, especially if you juggle a busy schedule but still crave homemade goodness. I often hear from friends how hard it is to find treats that taste amazing but also offer some nutritional value. This recipe delivers on all fronts. Here’s why it’s a must-try:
- No Oven Required: First and foremost, forget about heating up your kitchen! This is truly a no-bake wonder. You simply mix, press, and chill. It is the ideal dessert for hot summer days or when you simply don’t want to deal with oven temperatures.
- Protein-Packed Goodness: We all want to feel good about what we’re eating, and this cheesecake doesn’t disappoint. It includes protein powder and Greek yogurt, offering a fantastic protein boost. This helps you feel fuller and more satisfied, turning dessert into a smarter choice. It’s perfect for active families or anyone looking to increase their protein intake effortlessly.
- Incredibly Delicious: The fresh strawberry flavor combined with the rich, creamy texture of cheesecake is simply irresistible. It’s sweet, tangy, and utterly delightful. You’ll be amazed at how healthy something this delicious can be!
- Simple, Wholesome Ingredients: You won’t find any obscure ingredients here. This recipe uses everyday items you likely already have in your pantry or can easily find at any grocery store. Real food, simple preparation – that’s my kind of cooking.
- Kid-Friendly Favorite: My kids absolutely adore this strawberry protein cheesecake. The bright pink color and sweet berry flavor always win them over. It’s a fantastic way to sneak in some extra protein and real fruit without any complaints.
- Quick to Prepare: The actual hands-on prep time for this dessert is minimal, freeing up your precious time for other things. While it requires chilling, the active work is incredibly fast, making it ideal for busy weeknights or last-minute potlucks.
- Healthier Dessert Option: Say goodbye to heavy, sugary desserts. This no-bake cheesecake offers a lighter, more nutritious alternative. You can enjoy a slice without the usual guilt, knowing you’re treating your body well.
- Perfect for Meal Prep: Make a batch at the beginning of the week, and you have a delicious, healthy snack or dessert ready whenever cravings strike. It stores beautifully, meaning you always have a satisfying option on hand.
Trust me, once you make this No-Bake Strawberry Protein Cheesecake, you’ll wonder how you ever lived without it. It’s truly a recipe that embodies my philosophy: food is love, and it should be simple, nourishing, and absolutely delicious.
Ingredients You’ll Need
Gathering your ingredients for this delightful No-Bake Strawberry Protein Cheesecake is a breeze. I prioritize simple, accessible items that deliver big on flavor and nutrition. Here’s what you’ll need to create this creamy, dreamy treat:
| Component | Ingredient | Quantity | Notes |
|---|---|---|---|
| For the Crust: | Graham Crackers | 1 ½ cups (about 12 full sheets), crushed | Use whole wheat for extra fiber. |
| Almond Flour | ½ cup | Adds a lovely nutty flavor and texture. | |
| Melted Coconut Oil | ¼ cup | Binds the crust together beautifully. | |
| Maple Syrup (or preferred sweetener) | 2 tablespoons | For a touch of natural sweetness. | |
| For the Filling: | Cream Cheese (light or full-fat) | 16 oz (2 blocks), softened | Ensure it’s at room temperature for smooth mixing. |
| Plain Greek Yogurt | 1 cup (240g), full-fat recommended | Adds tang, creaminess, and protein. Skyr works too! | |
| Vanilla Protein Powder | ½ cup (about 2 scoops) | Your favorite brand works great! | |
| Fresh or Frozen Strawberries | 2 cups, hulled and sliced | Adds vibrant flavor and color. Thaw frozen strawberries first. | |
| Maple Syrup (or preferred sweetener) | ¼ cup, adjust to taste | Sweetens the filling naturally. | |
| Lemon Juice | 1 tablespoon | Brightens the strawberry flavor and adds a touch of tang. | |
| Vanilla Extract | 1 teaspoon | Enhances all the sweet flavors. | |
| For Garnish (Optional): | Fresh Strawberries | As desired, sliced | Adds a beautiful finishing touch. |
Having everything measured out and ready to go makes the process incredibly smooth. Trust me, a little prep goes a long way, especially when you have little ones “helping” in the kitchen!
Substitutions & Variations
One of the things I love most about cooking is how adaptable recipes can be. This No-Bake Strawberry Protein Cheesecake is no exception! Don’t have an ingredient?
Want to try a new flavor? No problem! Here are some of my favorite substitutions and variations to help you make this recipe truly your own, or simply use what you have on hand.
- Crust Alternatives:
- Nut-Based: Instead of graham crackers, try a blend of almond flour and crushed pecans or walnuts for a gluten-free and richer crust. Use about 1 ½ cups of finely ground nuts with the coconut oil and sweetener.
- Oat-Based: For a heartier crust, use rolled oats (quick-cooking or old fashioned, finely ground) combined with a touch of flour or nuts. This adds extra fiber.
- Cookie Crust: Feeling a little decadent? Use crushed digestive biscuits, vanilla wafers, or even chocolate sandwich cookies (like Oreos, without the filling) for a different flavor profile. Adjust the amount of melted fat as needed.
- Protein Powder Swaps:
- Flavor: While vanilla is classic, experiment with strawberry protein powder for an even more intense berry flavor, or even a subtle coconut or white chocolate protein powder.
- Type: I typically use whey protein isolate for its smooth texture, but you can use casein protein (which can make the filling slightly thicker), or a plant-based protein powder. Be aware that plant-based proteins can sometimes change the texture and sweetness slightly, so taste and adjust as you go.
- Sweetener Options:
- Maple Syrup: I love the natural caramel notes of maple syrup, but honey, agave nectar, or a sugar-free alternative like erythritol or stevia (liquid or granulated) also work beautifully. Adjust the quantity based on your preference and the sweetness of your protein powder.
- Cream Cheese Variations:
- Low-Fat: Neufchâtel cream cheese is a fantastic lighter option that still delivers a rich, creamy texture without as much fat.
- Dairy-Free: If you’re avoiding dairy, use a high-quality plant-based cream cheese and a dairy-free Greek yogurt alternative. The texture might vary slightly but it can still be delicious.
- Yogurt Choices:
- Skyr: This Icelandic-style yogurt is even thicker than Greek yogurt and provides an excellent protein boost. It works wonderfully in this recipe.
- Kefir Cheese: If you make your own kefir, straining it can yield a thick, tangy cream cheese-like product that works well.
- Fruit Fantasies:
- Mixed Berries: Instead of just strawberries, try a blend of raspberries, blueberries, and blackberries for a “mixed berry protein cheesecake.”
- Other Fruits: Peeled and pitted peaches, mangoes, or even a swirl of passion fruit puree could offer exciting tropical twists. Just be sure to blend them very smoothly.
- Fruit Puree: If you don’t have fresh fruit, unsweetened fruit purees (like apple or pear sauce, or even baby food fruit pouches) can be a quick substitute, though fresh fruit offers the best flavor and texture.
- Flavor Boosters & Add-ins:
- Citrus Zest: Add a teaspoon of lemon or lime zest to the filling for an extra bright, fresh flavor.
- Spices: A tiny pinch of cinnamon or cardamom in the crust can add warmth.
- Chocolate: Swirl in some melted dark chocolate or sprinkle mini chocolate chips into the filling or on top for a chocolate-strawberry combination.
- Coconut: Toasted shredded coconut sprinkled on top or mixed into the crust adds a tropical touch.
- Nut Butter Swirl: For a fun twist, warm a tablespoon or two of peanut butter (I love peanut butter overnight oats for breakfast, too!) and swirl it into the cheesecake filling before chilling.
Feel empowered to play around with this recipe! Cooking is about enjoyment and making food work for your family and your pantry. Don’t be afraid to experiment a little and discover your new favorite version of this healthy no-bake strawberry cheesecake.
Step-by-Step Instructions
Making this No-Bake Strawberry Protein Cheesecake is surprisingly straightforward. Follow these steps, and you’ll have a gorgeous, delicious dessert ready to chill in no time. We’ll tackle the crust first, then move on to that creamy, dreamy filling.
Step 1: Prepare Your Pan
First, lightly grease a 9-inch springform pan with coconut oil or baking spray. Then, line the bottom with parchment paper. This simple step makes removal incredibly easy later on.
Step 2: Make the Crust
- Crush the Graham Crackers: Place graham crackers in a food processor and pulse until finely ground into crumbs. Alternatively, put them in a zip-top bag and crush them with a rolling pin until fine.
- Combine Crust Ingredients: In a medium bowl, combine the graham cracker crumbs, almond flour, melted coconut oil, and maple syrup. Mix thoroughly until the mixture resembles wet sand and holds together when pressed.
- Press into Pan: Pour the crust mixture into the prepared springform pan. Use the bottom of a glass or your clean hands to firmly and evenly press the mixture into the bottom of the pan. Make sure it’s compact.
- Chill the Crust: Place the pan in the refrigerator while you prepare the filling. This helps the crust set up and become firm.
Step 3: Prepare the Strawberry Puree
- Blend Strawberries: In a food processor or blender, combine the hulled and sliced strawberries with 1 tablespoon of lemon juice. Process until completely smooth and pureed.
- Strain (Optional): For an extra smooth filling, press the strawberry puree through a fine-mesh sieve to remove any seeds. I usually skip this for a more rustic, fiber-rich cheesecake, but it’s an option!
- Set Aside: Set the strawberry puree aside.
Step 4: Create the Creamy Filling
- Whip Cream Cheese: In a large mixing bowl, using an electric mixer (handheld or stand mixer with a paddle attachment), beat the softened cream cheese on medium speed until it is smooth and creamy. Scrape down the sides of the bowl as needed.
- Add Yogurt and Sweetener: Incorporate the Greek yogurt, maple syrup (adjust to your sweetness preference), and vanilla extract. Beat again until everything is well combined and smooth.
- Mix in Protein Powder: Gently add the vanilla protein powder to the mixture. Beat on low speed until just combined. Be careful not to overmix, as this can make the filling too dense.
- Fold in Strawberry Puree: Pour the prepared strawberry puree into the cream cheese mixture. Beat on low speed or fold with a spatula until the filling is uniformly pink and all ingredients are incorporated. Taste the filling and add more sweetener if you like.
Step 5: Assemble and Chill
- Pour Filling Over Crust: Retrieve the chilled crust from the refrigerator. Carefully pour the strawberry protein cheesecake filling over the crust, spreading it evenly with a spatula.
- Chill Thoroughly: Cover the springform pan loosely with plastic wrap. Transfer the cheesecake to the refrigerator and chill for at least 4-6 hours, or preferably overnight. This is crucial for the cheesecake to set properly and achieve that perfect sliceable texture.
Step 6: Serve and Garnish
- Release from Pan: Once fully chilled and firm, carefully remove the sides of the springform pan. You can run a thin knife around the edge of the cheesecake before releasing to ensure clean edges.
- Slice and Garnish: Slice the No-Bake Strawberry Protein Cheesecake into servings using a warm, sharp knife (run it under hot water and wipe clean between slices for the cleanest cuts). Garnish each slice with fresh strawberries, a sprig of mint, or a dollop of light whipped cream, if desired.
And just like that, you have a beautiful, healthy, and absolutely delicious dessert ready to impress! It’s amazing what you can create with a little planning and these simple steps. This would be a fantastic finish to a meal of Smash Burger Tacos or Hot Honey Chicken Bowls!
Pro Tips for Success
Over the years, making countless versions of this healthy no-bake strawberry cheesecake, I’ve picked up a few tricks that make all the difference. These pro tips will help you achieve a perfectly creamy, beautifully set, and utterly delicious No-Bake Strawberry Protein Cheesecake every single time. As a busy mom, I always look for ways to simplify and ensure success, and these tips are my secret weapons!
- Room Temperature Ingredients are Key: This is perhaps the most important tip for any cheesecake, no-bake or otherwise! Ensure your cream cheese and Greek yogurt are at true room temperature. This means taking them out of the fridge at least 30-60 minutes before you start mixing. Softened cream cheese blends smoothly, preventing lumps and ensuring a silky, uniform filling. Cold ingredients will make your filling clumpy and difficult to work with.
- Don’t Overmix the Filling: Once you add the protein powder and especially the strawberry puree, mix just until combined. Overmixing can incorporate too much air, which can lead to a less dense and potentially less stable cheesecake once chilled. Beat on low speed or fold gently with a spatula for the best results.
- The Power of Chilling: Patience is a virtue when it comes to no-bake cheesecakes! The chilling time is not optional; it’s essential. A minimum of 4-6 hours is necessary for the cheesecake to fully set and firm up. Overnight chilling is even better, guaranteeing perfectly clean slices. Resist the urge to cut into it too early!
- For the Smoothest Strawberry Puree: If you prefer a filling without any tiny strawberry seeds, take an extra minute to push your blended strawberry puree through a fine-mesh sieve. This yields an incredibly smooth and luxurious texture. However, if you enjoy a little texture and want the extra fiber, feel free to skip this step.
- Compacting the Crust: A firm, well-compacted crust prevents crumbling. Use the bottom of a flat-bottomed glass or a measuring cup to really press the crust mixture firmly and evenly into the pan. This creates a solid base that won’t fall apart when you slice your cheesecake.
- Grease and Line Your Pan: Always grease your springform pan sides and line the bottom with parchment paper. This simple step is a lifesaver when it comes to easily removing the cheesecake without it sticking. It ensures a beautiful presentation every time.
- Achieving Clean Slices: For bakery-worthy slices, warm your knife under hot water, wipe it clean, and then make each cut. Repeat this process for every slice. This helps the knife glide through the creamy filling without dragging or sticking, creating sharp, clean edges.
- Taste and Adjust Sweetness: Different protein powders have varying levels of sweetness, and your personal preference also plays a role. Taste the filling mixture before you add it to the crust and adjust the maple syrup as needed. You want that perfect balance of sweet and tangy.
- Use Good Quality Greek Yogurt: I recommend full-fat Greek yogurt or Skyr for the creamiest, richest filling. The higher fat content contributes to a more luxurious texture and helps with setting. If you use a lower-fat version, your cheesecake might be slightly less firm, but still delicious.
- Plan Ahead for Garnishes: Think about how you want to present your cheesecake. Fresh strawberry slices, a few mint leaves, or a light drizzle of melted chocolate can elevate its appearance significantly. Preparing these garnishes just before serving keeps them fresh and vibrant.
With these tips in your toolkit, you’re well on your way to mastering this delightful No-Bake Strawberry Protein Cheesecake. Enjoy the process, and get ready to impress your family and friends!
Storage & Reheating Tips
Making this No-Bake Strawberry Protein Cheesecake is a fantastic way to have a healthy and delicious dessert on hand. Proper storage ensures it stays fresh and flavorful. Since this is a no-bake treat, reheating isn’t really a concern, but knowing how to store it correctly is crucial!
Storage in the Refrigerator:
- Cover Tightly: After removing the springform pan sides, place the cheesecake in an airtight container. If you don’t have a container large enough, cover the entire cheesecake tightly with plastic wrap, ensuring no air can get to the exposed surfaces. This prevents it from absorbing odors from other foods in your fridge and keeps it from drying out.
- Shelf Life: Stored correctly in the refrigerator, your No-Bake Strawberry Protein Cheesecake will stay fresh and delicious for 4-5 days. The texture might soften very slightly over time, but the flavor will remain excellent.
Freezing for Longer Storage:
Yes, you can freeze this healthy no-bake strawberry cheesecake! This is a fantastic option if you want to make a batch ahead of time or simply save some for later. I often do this to ensure I always have a guilt-free treat ready for unexpected cravings.
- Pre-Freeze Slices: For best results, I recommend freezing individual slices rather than the whole cheesecake. Slice the fully chilled cheesecake first.
- Flash Freeze: Place the individual slices on a parchment-lined baking sheet, ensuring they aren’t touching. Flash freeze them for about 1-2 hours, or until firm. This prevents them from sticking together.
- Wrap and Store: Once firm, wrap each slice individually in plastic wrap, then again in aluminum foil. Place the wrapped slices in a freezer-safe bag or airtight container.
- Freezer Life: The frozen No-Bake Strawberry Protein Cheesecake slices will maintain their quality for up to 1-2 months. Beyond that, the texture might start to degrade slightly, but it will still be safe to eat.
Thawing Frozen Cheesecake:
When you’re ready to enjoy a frozen slice, simply:
- Transfer to Fridge: Remove a wrapped slice from the freezer and place it in the refrigerator.
- Thaw Slowly: Allow it to thaw slowly in the fridge for 2-3 hours, or until it reaches your desired consistency. You can also let it sit at room temperature for about 30 minutes for a slightly softer texture.
- Enjoy! Unwrap and enjoy your perfectly thawed, delicious strawberry protein cheesecake!
Remember, this is a no-bake dessert, so it’s best enjoyed chilled. No need for a microwave or oven here!
What to Serve With This Recipe
This No-Bake Strawberry Protein Cheesecake is so delicious and satisfying on its own, it hardly needs company! However, sometimes a little something extra can elevate the experience or make it feel like a more complete dessert or snack. As Emilia, I always think about balancing flavors and making a meal feel special, even with simple additions.
- Fresh Berries: You can never have too many berries when strawberries are involved! A handful of fresh, seasonal strawberries, blueberries, or raspberries on the side or artfully arranged on top adds a burst of freshness, extra vitamins, and a beautiful pop of color.
- Light Whipped Cream: A dollop of lightly sweetened whipped cream (or even coconut whipped cream for a dairy-free option) adds an extra layer of creamy indulgence without being overly heavy. You can whip it yourself with a touch of vanilla and a little sweetener for maximum freshness.
- Chocolate Drizzle: For the chocolate lovers in your life (and let’s be honest, who isn’t?), a light drizzle of melted dark chocolate or a homemade chocolate syrup creates a classic and irresistible strawberry-chocolate pairing.
- Mint Sprig: A simple sprig of fresh mint adds a sophisticated touch and a lovely aromatic contrast to the sweetness of the cheesecake. It’s an easy way to make any dessert look more elegant.
- A Warm Beverage: Pair a slice of this cool, creamy cheesecake with a comforting cup of coffee, herbal tea, or even a decaf latte. It’s the perfect afternoon pick-me-up or evening unwind.
- After a Light Meal: This protein-packed dessert is a wonderful ending to a lighter dinner. Imagine serving it after a fresh salad or a delicious and protein-packed High Protein Pasta Salad. It satisfies that sweet craving without leaving you feeling overly full.
- For Brunch: Believe it or not, a slice of this healthy cheesecake can even make a delightful addition to a weekend brunch spread. It’s healthier than many traditional pastries and offers a good protein boost to start your day.
The beauty of this No-Bake Strawberry Protein Cheesecake lies in its versatility. It’s truly a star on its own, but it also welcomes simple additions that enhance its charm without overwhelming its delicious, wholesome character.
FAQs About This No-Bake Strawberry Protein Cheesecake
I get a lot of questions about this recipe, and I love answering them! It shows how much people appreciate a delicious, healthy, and simple dessert. Here are some of the most common questions I receive about this No-Bake Strawberry Protein Cheesecake:
Can I make this No-Bake Strawberry Protein Cheesecake ahead of time?
Absolutely! This is one of the best things about this recipe. It requires a good chilling time anyway, so making it a day or even two ahead of time works perfectly.
In fact, I often find that the flavors meld even more beautifully after a full 24 hours in the fridge. Simply prepare it as instructed, cover it tightly, and let it chill. It will be ready to serve whenever you are!
What kind of protein powder works best for this protein cheesecake?
I primarily use a good quality vanilla whey protein isolate. It blends very smoothly and has a neutral enough flavor that it doesn’t overpower the strawberries. However, you can absolutely experiment with other types!
A vanilla casein protein powder will also work and might even make the cheesecake a little firmer. If you use a plant based protein, be aware that the texture might be slightly different some can be a bit grittier or absorb more liquid, so you might need to adjust the amount of Greek yogurt or strawberry puree slightly to get the desired consistency. Always taste and adjust sweetness, as protein powders vary widely in flavor and sweetness.
Is this healthy no-bake strawberry cheesecake suitable for dietary restrictions?
This recipe is naturally high in protein and can be adapted for several dietary needs. For a gluten-free version, simply use gluten-free graham crackers or switch to a nut-based crust (like almond flour and ground pecans). For a dairy free option, use dairy free cream cheese alternatives and a plant based Greek yogurt (such as coconut or almond based).
Ensure your protein powder is also dairy free. For a sugar free version, use a granulated sugar substitute like erythritol or stevia in place of maple syrup in both the crust and the filling. Always double-check ingredient labels to ensure they meet your specific dietary requirements.
How long does it take for this no-bake cheesecake to set?
The minimum chilling time for this No-Bake Strawberry Protein Cheesecake to properly set is 4-6 hours. During this time, the ingredients firm up and the flavors fully develop. However, for the absolute best results meaning a perfectly firm, sliceable cheesecake with clean edges I highly recommend chilling it overnight, or for at least 8 hours. Don’t rush this step; it’s crucial for the success of your cheesecake!